(function(w,d,s,l,i){w[l]=w[l]||[];w[l].push({'gtm.start': new Date().getTime(),event:'gtm.js'});var f=d.getElementsByTagName(s)[0], j=d.createElement(s),dl=l!='dataLayer'?'&l='+l:'';j.async=true;j.data-privacy-src= 'https://www.googletagmanager.com/gtm.js?id='+i+dl;f.parentNode.insertBefore(j,f); })(window,document,'script','dataLayer','GTM-PF5R8F7');

CodeREADr Connector Add-On

CodeREADr Connector: Add-on for Google Sheets TM

Getting Started with CodeREADr Connector

Initial Setup Steps

For setting up your connections, we recommend having the add-on sheet open as well as the CodeREADr website open and signed in to your account.

  1. Install the CodeREADr Connector add-on from Google Marketplace.
  2. Sign up for a Free Account on CodeREADr’s website. It will be limited to 50 scans and 10 API calls per minute but that should be sufficient for testing. You can keep the CodeREADr website open to help during the rest of the setup process and when configuring your own workflows.
  3. Download the CodeREADr: Barcode Scanner app for free
  1. From the CodeREADr Connector, click Getting Started and enter your CodeREADr API Key. This is required to proceed further.

Finding your CodeREADr API KEY

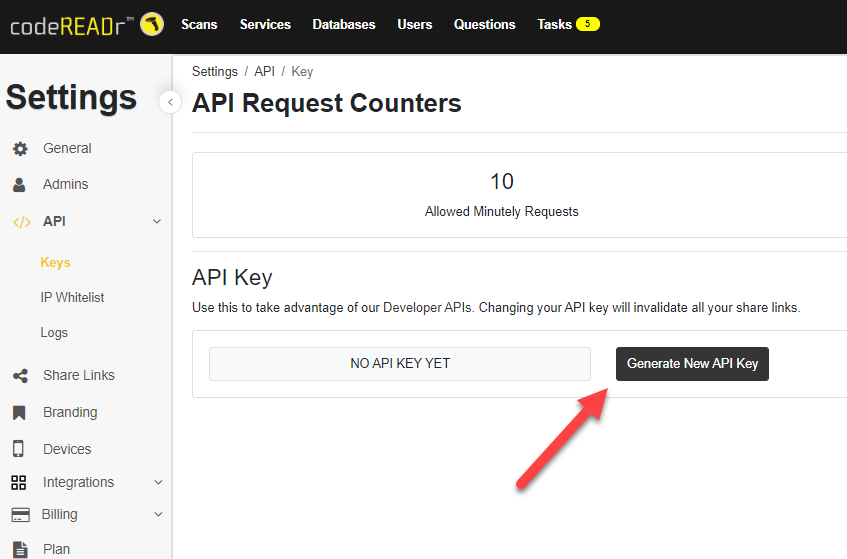
Provided you’ve created a CodeREADr account (free option), you can sign in to the website and navigate to Account > Settings > API > Keys.

Generate a new API KEY

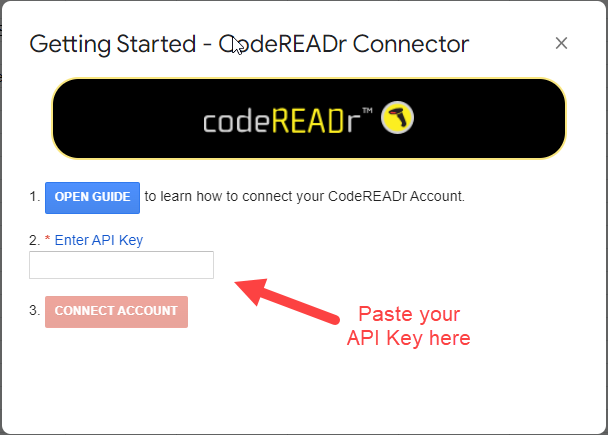
Copy the API Key. Go to the connector and click on the “Getting Started” link to paste the API Key in the appropriate field. Once done, the sidebar will appear on the right side of the sheet.

Paste API KEY

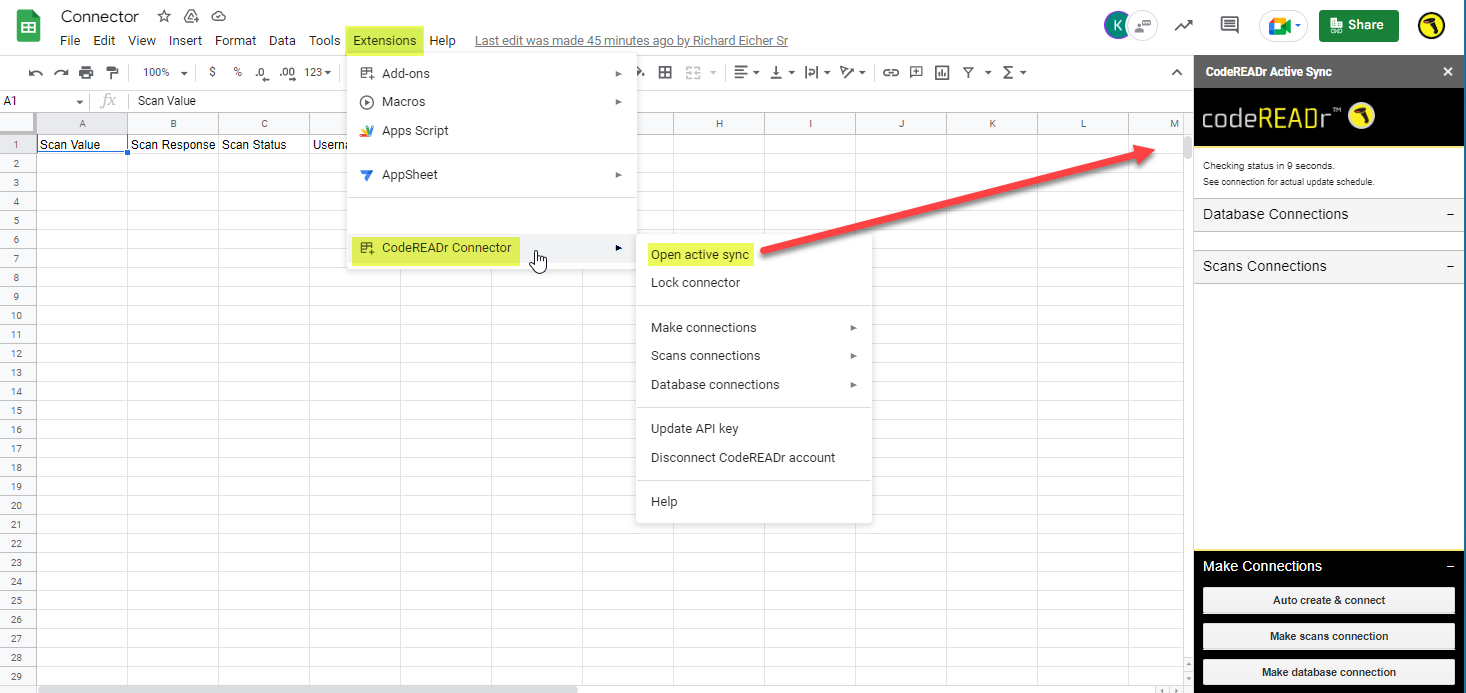
Once you’ve installed the CodeREADr connector from the Google Marketplace, use the Extensions dropdown to start making your connections.

CodeREADr Connector Extension

You will see these Make Connections options in the sidebar

Make Connections

Auto Create & Connect

Record Scans

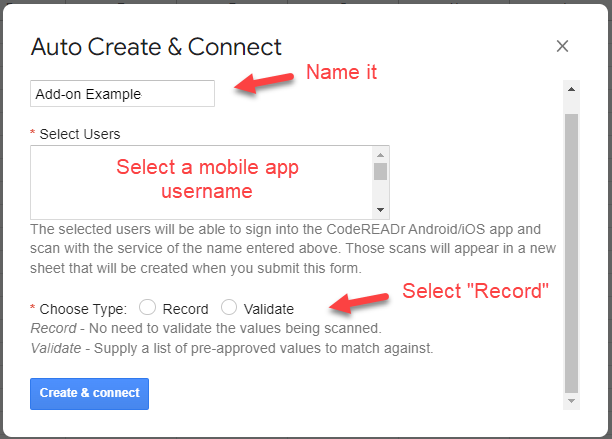
This is the easiest way to start if you only want to record scans to a sheet using the CodeREADr mobile app. From the add-on’s sidebar (or dropdown menu) select “Auto create & connect”.

You can use the default name “Add-on Example” or rename it. For Users, if you are new to CodeREADr your only choice will be the signup email address. At any time you can add app usernames here.

Auto Create and Connect Guide

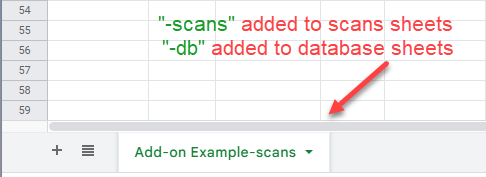
The scan connection will be made. You will see the tab in the sheet here:

Scan Connection Tab

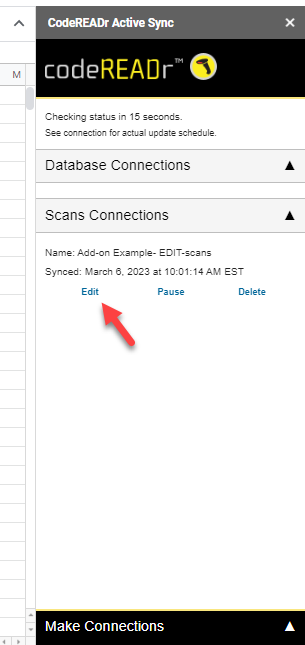
Now you can edit the connection.

Edit Connection

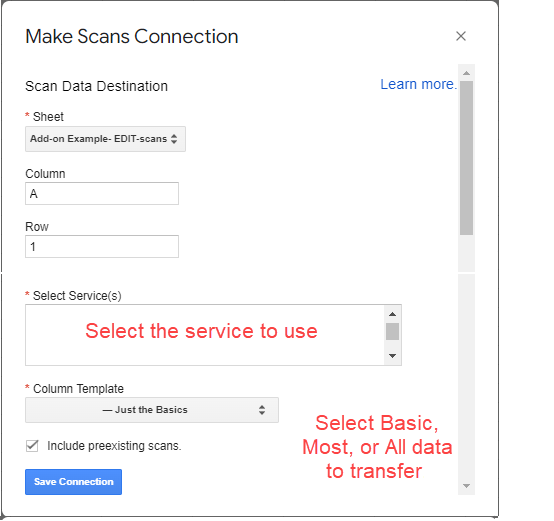
Select the sheet to insert scans. Select the start column and row. Select the starting column and row. Select the service from which the scans will come. Then select the template by the amount of data to insert from each scan.

Scans Connection Edit

You will see the service created on the CodeREADr website:

Scans Connection Service

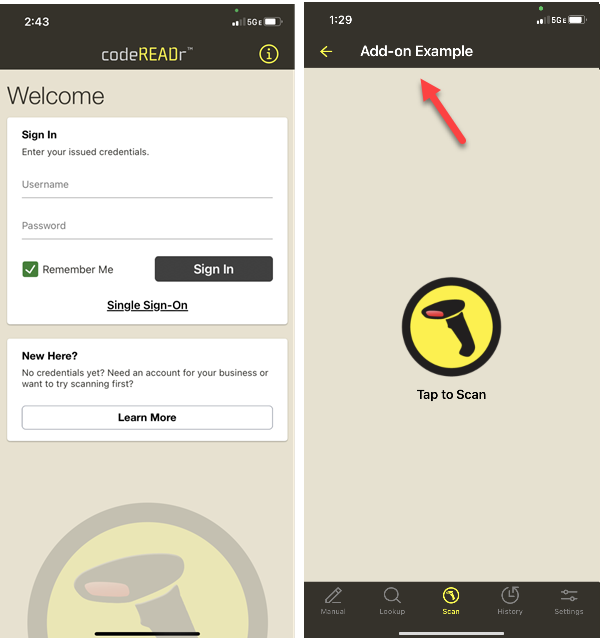
When you sign in to the CodeREADr mobile app this is what you will see:

Auto Record App Screenshots

When you scan with that service, the scans will populate the connected sheet based on the template you selected.

Validate Scans

Follow the “Record instructions except you will select “Validate” instead of Record. In addition to a new Scans Connections tab in the sheet, you will see a Database Connections option to edit the connection.

Database Connection Edit

A database tab and a scans tab are automatically created in the sheet. Note that the database tab includes a “-db” suffix and the scans tab includes a “-scans” suffix for easy identification.

Database tabs

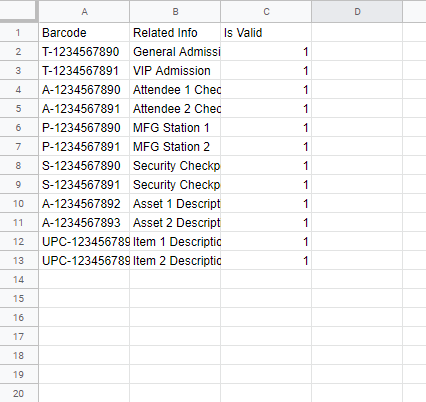
The sheet and database are auto-populated with sample barcode values. You can use this PDF to scan the QR codes of those values. [Note that the CodeREADr mobile app can scan all commercial barcode types, not just QR codes.]

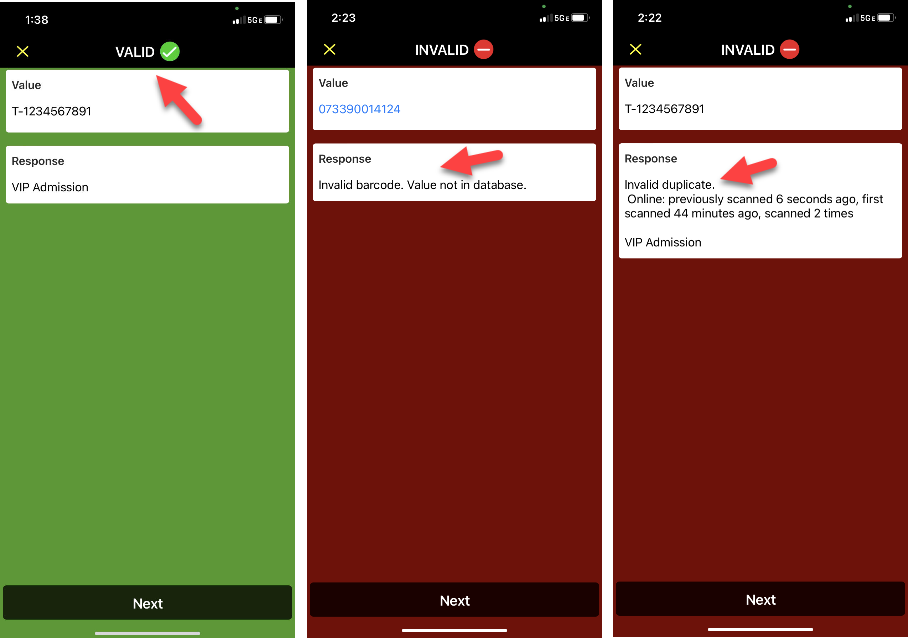
When scanning with the auto-created validate (database) service the first scan will be valid and a duplicate scan will be invalid. Scanning a QR code or barcode that’s not in the database will also be invalid. Those options are configurable on the CodeREADr website.

You will replace these sample values with your own values manually or use copy and paste. You can also programmatically insert values into the sheet from another sheet or a third-party application. The format must be maintained, i.e. the barcode value in column 1, related info in column 2, and the status in column 3. The status by default is valid (“1”) but in some applications, you may want to make some values invalid (“0”).

Demo DB Values

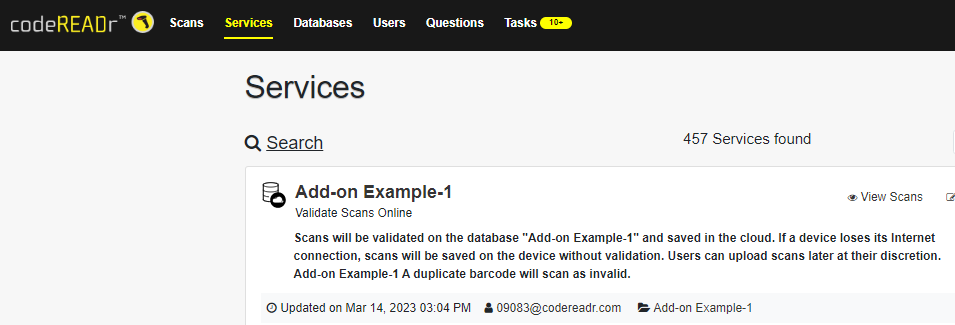
You will see the Validate service on the CodeREADr website:

DB Service

And you will see the database on the CodeREADr website:

DB Database

When you sign in to the CodeREADr mobile app, these are the results of a valid scan screen (barcode value in the database), an invalid scan screen (barcode value not in the database), and an optional invalid duplicate scan screen (barcode value has already been scanned within a defined period).

Auto Validate App Screenshots

Make Scans Connection or Database Connection

The “Make scans connection” and  “Make database connection” options do not automatically connect scans and databases. Instead, admins create a wide variety of application-specific workflows (aka “Services”) on the CodeREADr website. Once created, the admin can directly connect to those services and databases.

CodeREADr Background

The CodeREADr website and barcode scanning apps enable admins to globally configure workflows in the cloud and then sync those services to the devices of their authorized users. For examples of popular workflows, please look at our Barcode Scanning and Data Collection Solutions. For detailed instructions, videos, and FAQs regarding each configuration, please look at our knowledgebase under Common Applications & Instructions.

Common questions we’ve received from administrators include how to automate the importing of databases and the exporting of scan records. There are many ways to integrate, including developer APIs, webhooks (Postback URLs), and third-party services. Learn more about CodeREADr integrations here. Admins can schedule scan exports and use the API to import databases.

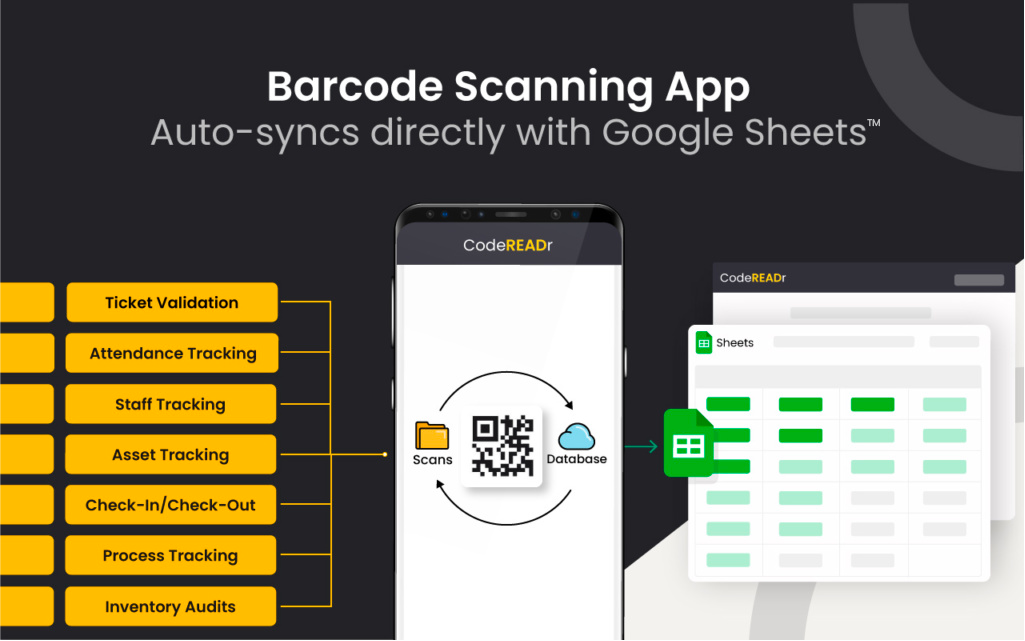
In addition, admins have often requested methods to automate data I/O using Google Sheets TM. To that end, we created the CodeREADr Connector.

Make Scans Connection

From the sidebar, select “Make scans connection”.

Make Connections

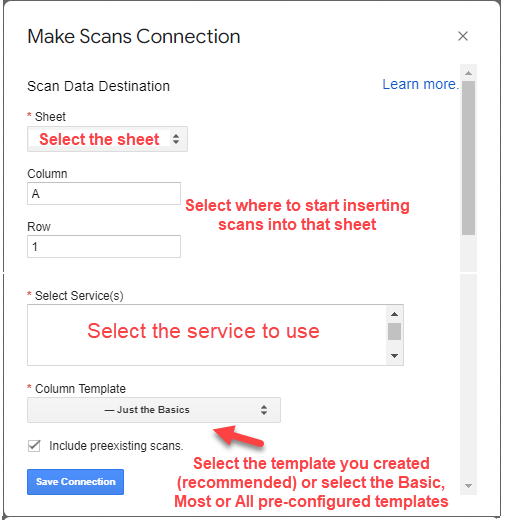
Now you can edit the connection.

Make Scans Connections

When saved, scans from the selected service will populate the selected sheet. Note: To create your own template, follow this Export Template article.
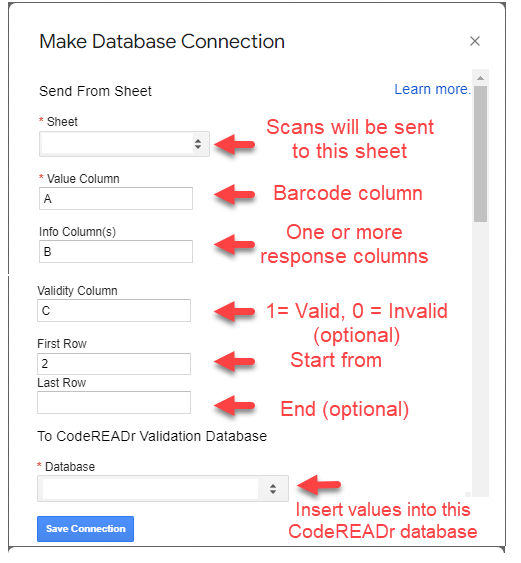
Make a Database Connection

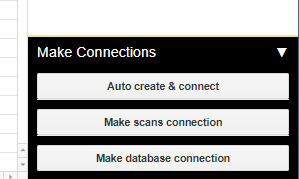
From the sidebar, select “Make database connection”.

Make Database Connections

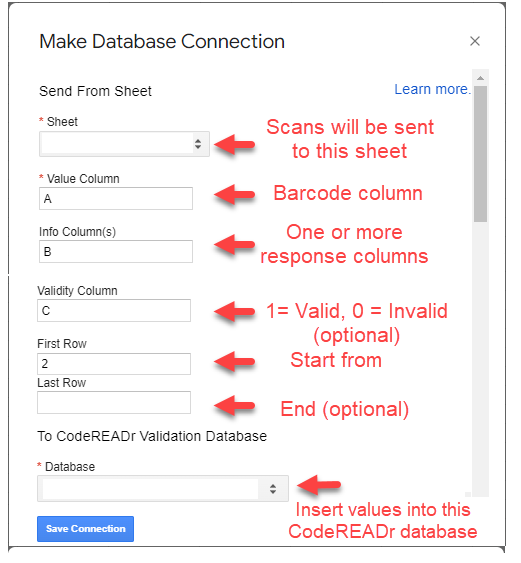
When saved, database values from the selected sheet will populate the selected database on CodeREADr.com.

Fundamentals of Data Transfer

Overview

It’s important to understand the difference between recording scans and validating scans against a database.

  • Record: This option records scans made with the mobile app and syncs them to your sheet. It automatically creates a scanning service on CodeREADr, a mobile app user, and the sheet into which scan records will be automatically inserted. It also creates a “basic” template format with a limited number of columns. Once created, you can edit the connection to use a template including “most” or “all” data if that’s your preference.

If you want to add supplemental data to each scanned record (e.g. answers to multiple-choice questions, dropdown menus, GPS locations, signatures, photos, etc.) you’ll need to create your service and export template on the CodeREADr website. See “Make Connections” below.

  • Validate: This option validates scans made with the mobile app. It automatically creates a scanning service on CodeREADr, a mobile app user, a CodeREADr database, and a database sheet to populate with your ticket IDs, employee/member/student IDs, asset IDs, or inventory UPC/SKU numbers.

Those “values” will automatically sync to the CodeREADr database. When the app user scans a barcode, if it is in the database, it will be Valid. If not, it will be Invalid. You can optionally enable duplicate scans of the same value to always be invalid or invalid for a defined period.

All scans made will automatically sync from CodeREADr’s servers directly to the “scans” sheet.

Syncing Data

  • Scans
  1. Syncing only occurs when there are new scans or edited scans.
  2. New scans and edited scans are appended to the end of the scans sheet.
  3. If you configure a service with a post submit question you may see two new synced rows in your sheet. What happens with a post submit question is the app submits the scan data first, then prompts the app user to answer a question(s). That will result in two submissions and, depending on the sync timing, sometimes two rows in your sheet. To avoid that, configure your questions to be asked before submitting the scan if appropriate for your work flow.
  4. Scan rows in a sheet that have been edited will not be overwritten.

Note: If desired, the data residing on the synced sheet can be transferred to another sheet for processing. If you are not familiar with how to do that, there are many online consultants that offer expert assistance for modest fees. Also, there are many apps that have sheet integrations, including Zapier, MAKE, and others. 

  • Database
  1. With the sidebar open, if the content in a row changes or a new row is added, the rows will be synced every minute.
  2. Deleted rows will not immediately sync. Deletions are synced on a defined schedule based on database size (see below).
  3. The scheduled syncing process first clears the connected database on the server and then uploads all of the database values. The clearing action is necessary in case rows have been removed from a sheet. Clearing does not change the duplicate status if duplicate checking is optionally enabled.
  4. If the value column has duplicates in it, the duplicated values will not be synced. Only the first row of a duplicated value will sync.

Syncing Modes

A. If the sheet’s sidebar IS open then active sync is enabled. Syncing schedules are as follows.

  1. Scans are synced every minute to the sheet.
  2. Database values are synced depending on the file size:
    • Less than 500 values are synced in a minute or less
    • Less than 5,000 values are synced every 5 minutes
    • Less than 10,000 values are synced every 10 minutes
    • Less than 20,000 values are synced every 20 minutes
    • 20,000 or more values are synced every 60 minutes

B. If the sheet’s sidebar IS NOT open:

[NOTE: The background syncing option is paused for code updates. You will need to manually sync temporarily unless the sidebar is open.]

  1. Scans are synced in the background every 60 minutes to the sheet unless manually initiated from the Extensions dropdown.
  2. Database values are synced in the background every 60 minutes unless manually initiated from the Extensions dropdown.

C. If using the Extensions dropdown:

  1. Scans start syncing immediately.
  2. Databases start syncing immediately but will be completed based on the file size (see “Database Notes” above).
Dropdown Syncing

Important Database Notes:

  • Database uploads of less than 10,000 values will sync almost immediately once the syncing starts. Database uploads of more than 10,000 values will take several minutes longer depending on how big the file is.
  • The “Checking status in 0 seconds” message is when the connector checks each connection status. If uploading a large file, the seconds counter may show “0” temporarily until the file has synced.
Checking Status

Google Sheets™ is a trademark of Google LLC