How to Automate Exporting Scan Records
Schedule Exports with Tasks
You can use a Task to schedule and automatically filter and export your scan records.
- Box
- Dropbox
- FTP
- Google Drive
- Microsoft Azure (coming soon)
- S3
- SFTP
CSV Download Links for Exporting and Sharing Scan Records
Create a CSV Download Link to automatically insert filtered scan records into third-party databases that accept this type of link.
- Excel – see instructions below
- Google Sheets: see instructions below, including the option to auto sync in real-time.
- QuickBase: see the manual import of a CSV file
Note: Some Business Intelligence (BI) Platforms allow CSV imports, including Microsoft’s Power BI, Tableau, and other BI platforms. Some directly enable imports but others only after the records reside in apps like Excel or Google Sheets.
Export Templates
It is highly recommended to create an Export Template to automatically structure your scan downloads and exports.
No-Code Webhooks
With webhooks, you can insert scan records into 4,000+ cloud apps and services.
- Zapier features and instructions
- Make (formerly Integromat) features and instructions
- Pabbly Connect features and instructions
- Others: contact us
Triggers and Actions
Triggers allow scan records to be inserted into third-party apps and services. [Note: In some cases, it’s easier to create triggers with the Webhook options noted above.]
Actions allow third-party apps and services to insert database values into a CodeREADr database. Zapier, Integromat, and Pabbly Connect each have integrations with CodeREADr.
For Zapier, see example applications on our blog. You’ll see how to use CodeREADr as a trigger. Once integrated, you can filter incoming records and trigger specific actions. For example, Zapier allows you to do things like sending an email when a scan contains certain variables. Also, you can use an action to add or update barcode values.
Developer Integration
Developers can insert scan records into their own or third-party databases. Options include:
Excel and Google Sheets Instructions
Filter and Format Your Data
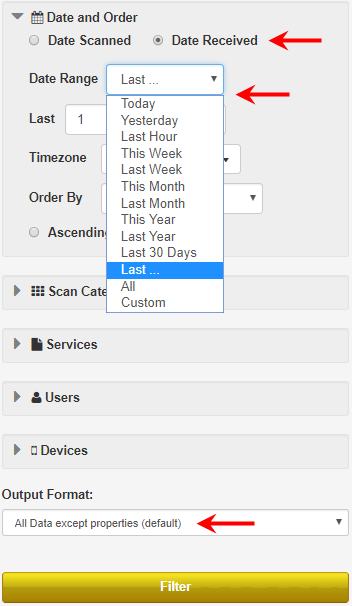
Optionally, create an Export Template for barcode scan records to configure which columns to export, their order, the header names, and the format. For example, time and date can appear in one column or in two columns. Also, filter your records based on the data needed for the export.
We recommend using the default ‘Date Received’ option as that’s the date the scans are received by our server. Then, you are sure to get all your scans if an app user didn’t upload scans in a timely fashion. Moreover, it is useful in case your internet connection is not stable. Also, if you’ve created an Export Template, be sure to select it as the Output Format.
Note: For GPS, photo, and signature URLs to be active links in Excel and Sheets, you need to configure the Export Template to include a URL. Then, you will need to configure Excel and Sheets for URLs to be clickable or simply double-tap the URL in the cell.
Create a CSV Download Link
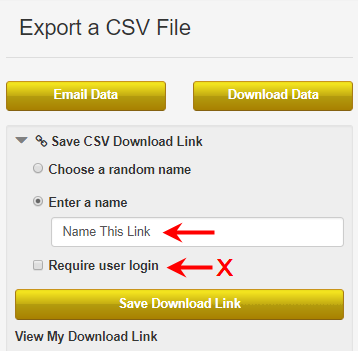
When creating a CSV download link to export scan records, be sure to name the link and do NOT require a user login. Then, save the link for inserting it into Excel or Sheets.
Note: If you exceed 10,000 exported records, you should use a Download Scans Task URL instead of this CSV Download link.
Insert Link into Google Sheets or Auto Sync in Real Time
You have two options.
- Insert the CSV Download link into a sheet. (or)
- [Recommended] Auto sync in real time using the CodeREADr Connector, an add-on for Google Sheets. This is recommended because you can not only sync scans down from the CodeREADr servers but you can also use the add-on for syncing databases up to the CodeREADr servers. After installing the add-on to your Google sheet, please refer to these instructions.
Insert Link into Excel
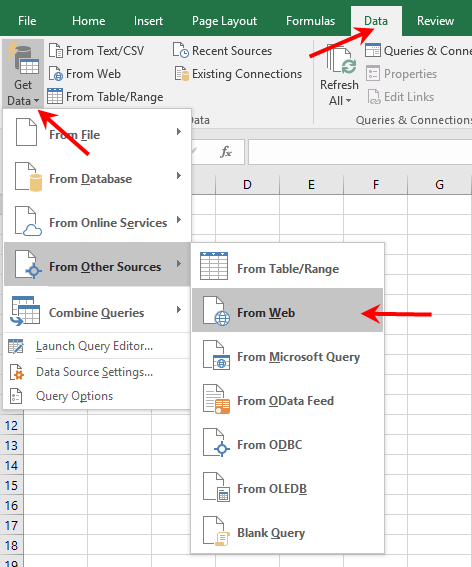
First, in an Excel sheet, click on “Data”. Second, click “Get Data.” After clicking “From Other Sources” choose “From Web.” This example uses Excel offline. If you don’t see the option for “Get Data”, you may need to ask for permission from your IT/network administrator.
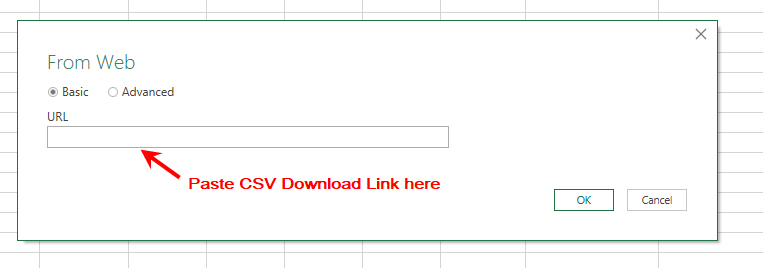
It can take several seconds (or more) for this From Web form to be presented. Insert the CSV Download Link in the form field and click OK.
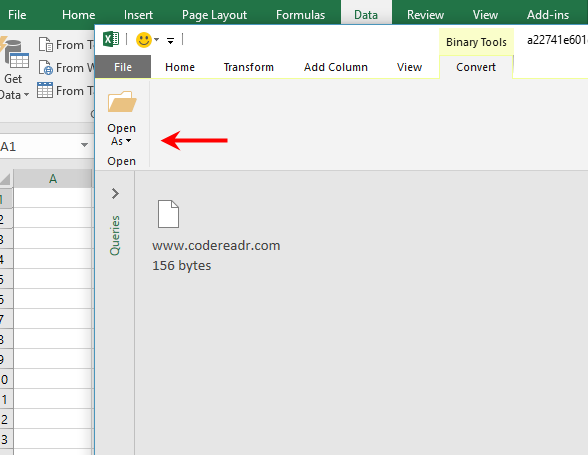
Select “Open As”
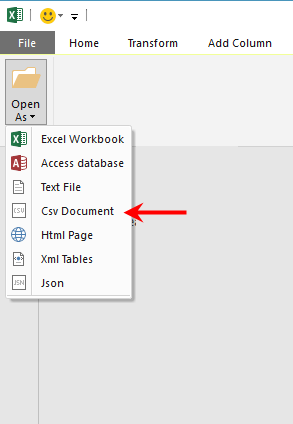
Then, choose “CSV Document”
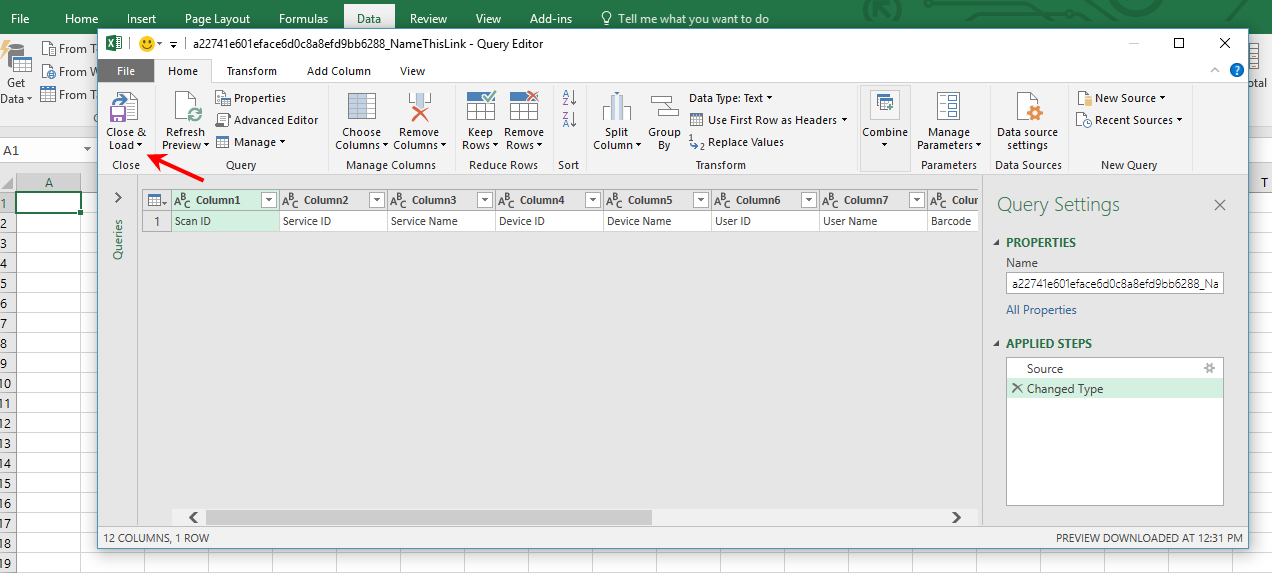
The worksheet will show the headers of your Export Template or the default headers if you’ve not created a custom template. Click “Close and Load.”
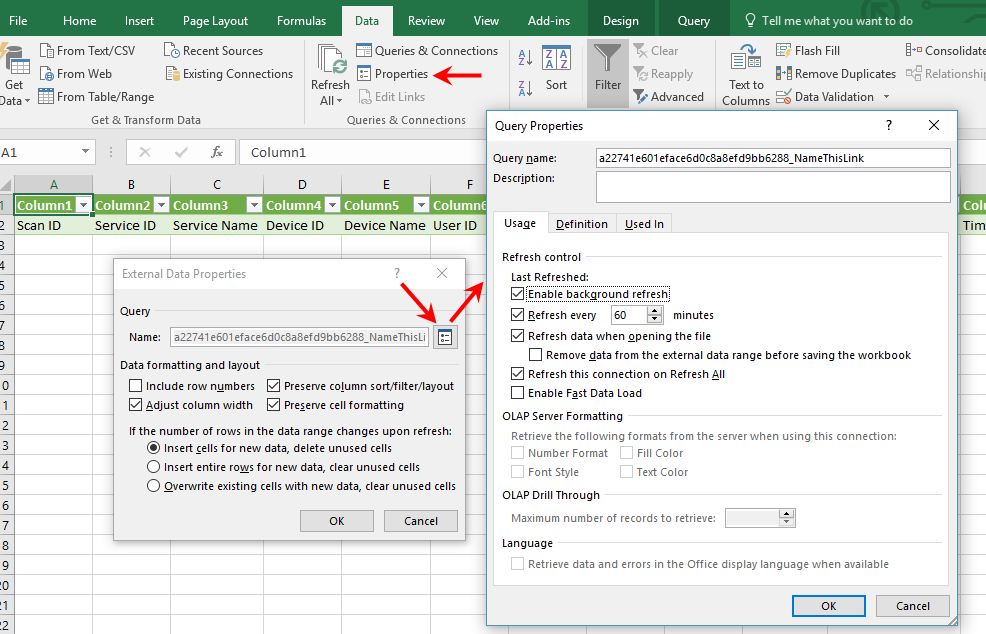
Once it loads to your actual sheet, choose “Properties” to choose the format, layout, and what you want the refreshing of the sheet to do. Then, click the icon next to the Query Name to set the Query Properties.
QuickBase CSV Import
Without using CodeREADr or QuickBase APIs, you can create CodeREADr Services directly on our website.
If a record-only type Service (i.e. no database required), simply decide what information you want to collect after each scan. If a validation type Service (i.e. validating against a database of barcode values), determine what information you want to collect after each scan. However, you need to import a simple CSV file to CodeREADr’s servers. That file includes the barcode values to validate against and any associated content, such as conditions or descriptions for those values.
After scanning, you can filter and export a CSV file of your scan records. Then, import them into QuickBase.
This video shows scanning for logistics.
