
CodeREADr’s Verify Generated List Specialized Service confirms that every item on a list is picked, packed, or received: the right items, in the right quantities, with nothing scanned twice. You generate the barcodes for each list in CodeREADr, so your items don’t need barcodes of their own, and no ERP, WMS, or other integration is required.
Each list gets one list barcode plus one indexed item barcode for every item on it. App users scan the list barcode to start, then scan each item. Every scan is checked against the list the moment it’s made, and the app shows a green VALID or red INVALID result along with the list’s progress. From the web, the Monitor tab shows every list and any discrepancies.
It’s a good fit for:
- Receiving: confirm a shipment arrived complete before you sign for it.
- Pick/pack and staging: confirm an order is complete before it ships.
- Loading: confirm every carton or pallet on a load made it onto the truck.
Internet connection required. Scans are validated in the cloud as they’re made, so devices need Wi-Fi or cellular data while scanning with this service.
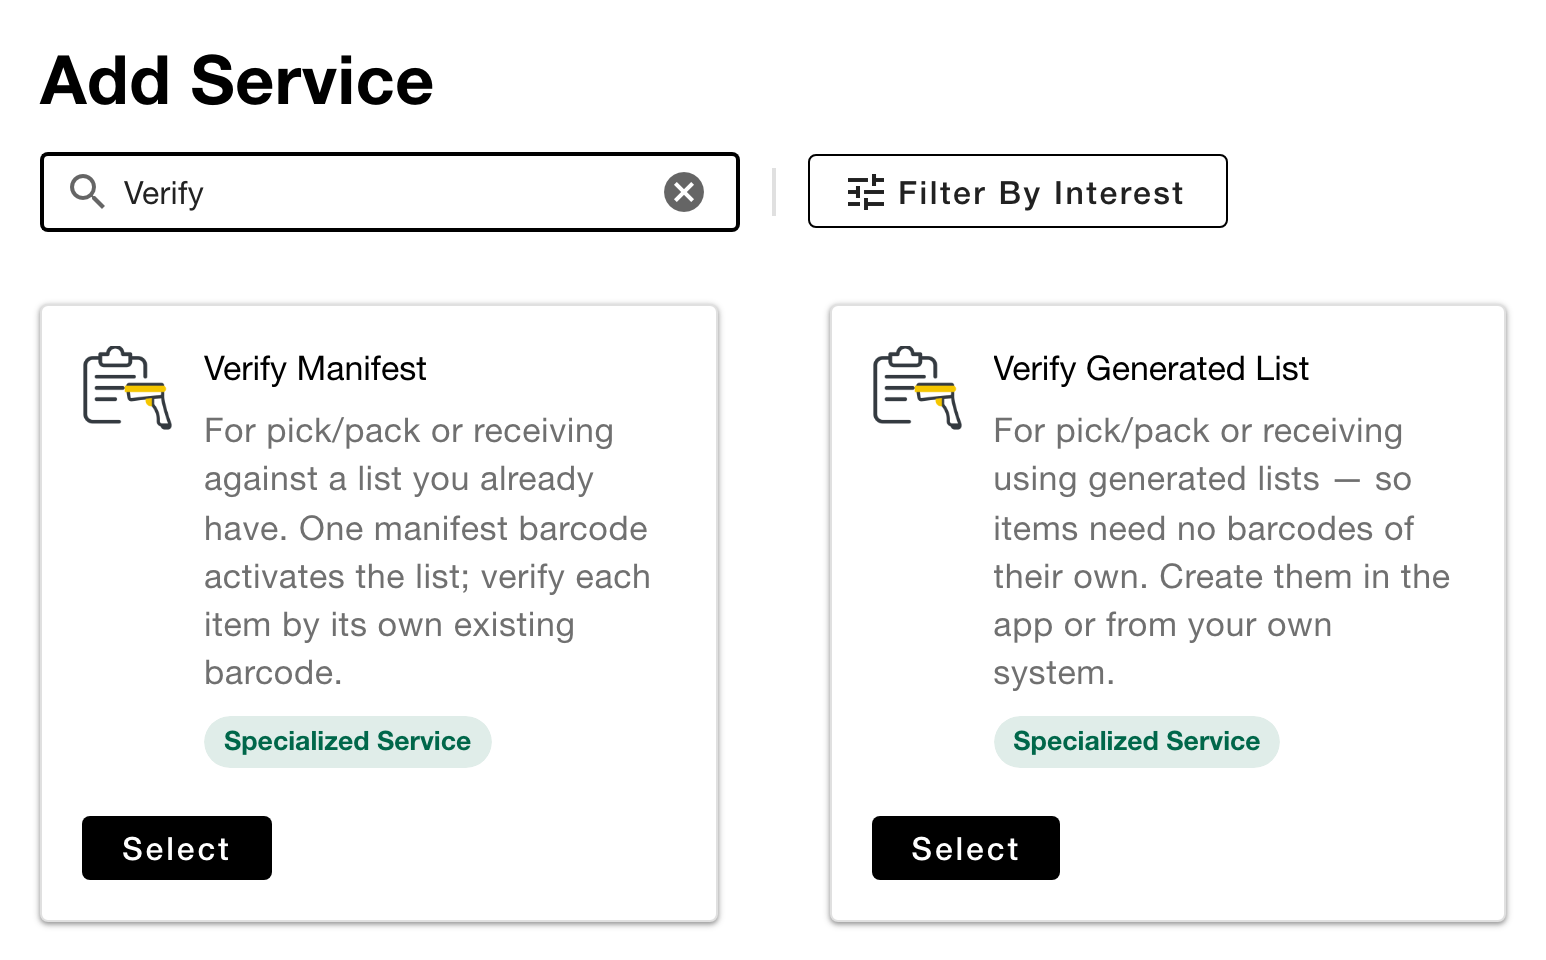
Already have a manifest, and items that carry their own barcodes (UPCs or SKUs)? Use the Verify Manifest specialized service instead.
How it works
- Add the service and choose its Accuracy Mode.
- Generate a list on the Generator tab, then print a label for the list and one for each item.
- Choose who scans on the Users tab.
- Scan the list barcode, then every item, in the CodeREADr app.
- Monitor progress and discrepancies on the Monitor tab.
What’s inside the barcodes
Each list’s structure travels inside its barcodes, which is how a scan can be checked on the spot. With the default delimiters (- for the list barcode, | for item barcodes), the barcodes for list PO10482 look like this:
| Barcode | Format | Example |
|---|---|---|
| List barcode | List ID – List total | PO10482-6 |
| Item barcode (Full Tracking) |
List ID | List index | List total | Item ID | Item index | Item quantity | PO10482|002|6|SKU1002|001|2 |
| Item barcode (Count Only) |
List ID | List index | List total | PO10482|002|6 |
So PO10482|002|6|SKU1002|001|2 is the 2nd of 6 items on list PO10482, and the 1st of 2 units of item SKU1002:
- List ID: your identifier for the list, such as a PO, order, shipment, or bill of lading number.
- List index: the item’s position in the whole list, from 1 to the list total.
- List total: how many items the list contains.
- Item ID (Full Tracking only): what the item is, such as a SKU, part number, or UPC.
- Item index (Full Tracking only): the unit’s position within its item ID, from 1 to the item quantity.
- Item quantity (Full Tracking only): how many units of that item ID the list contains.
You don’t need to build these values yourself. The Generator does it for you.
Step 1: Add the service
On the Add Service page, select Verify Generated List.
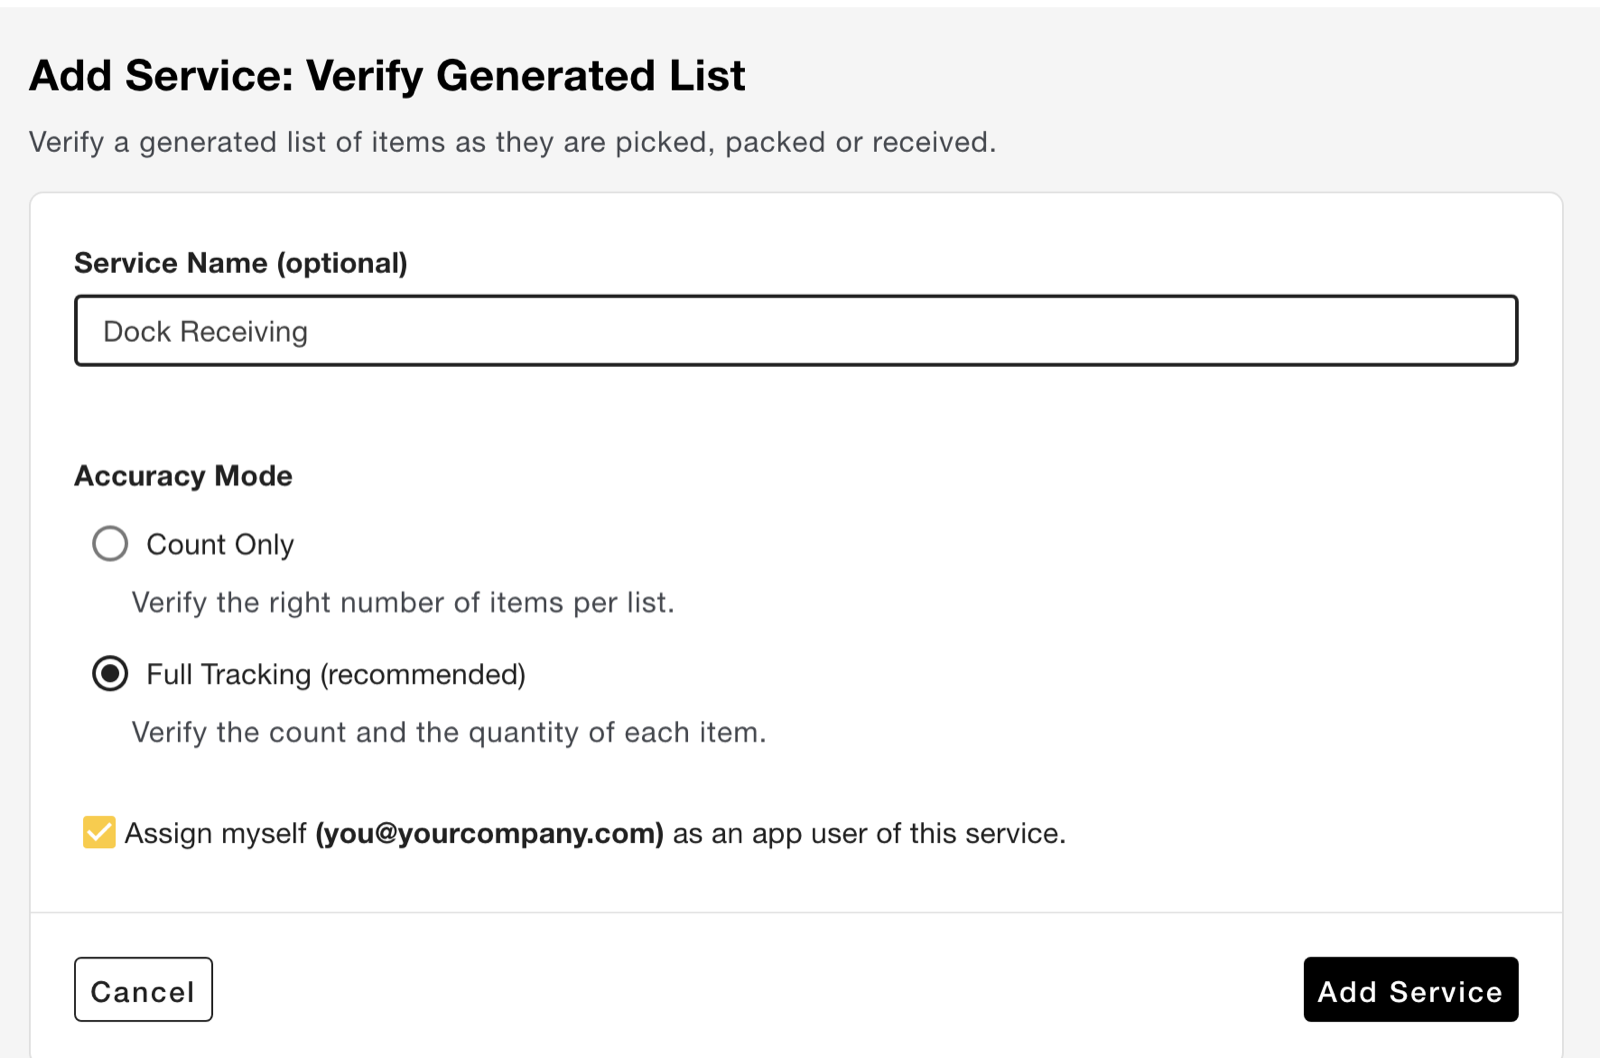
- Service Name (optional): up to 50 characters. Choose something your app users will recognize, like “Dock Receiving”. If you leave it blank, a name is assigned for you.
- Accuracy Mode: choose how closely each list is checked.
- Count Only: verifies the right number of items on each list. Item barcodes carry the list ID, the item’s position, and the list total.
- Full Tracking (recommended): verifies the count and the quantity of each item ID. Item barcodes also carry the item ID and its quantity, so the app shows progress for each item ID as well as the list.
- Assign myself as an app user: checked by default, so you can scan with the service right away.
Click Add Service. The service opens on its Monitor tab. Its other tabs are Generator, Scans, Users, and Manage.
Note: The Accuracy Mode can’t be changed after the service is created. To use the other mode, add another Verify Generated List service.
Step 2: Generate a list (Generator tab)
Build the list, then export its barcode data for your label printer, print shop, or WMS.
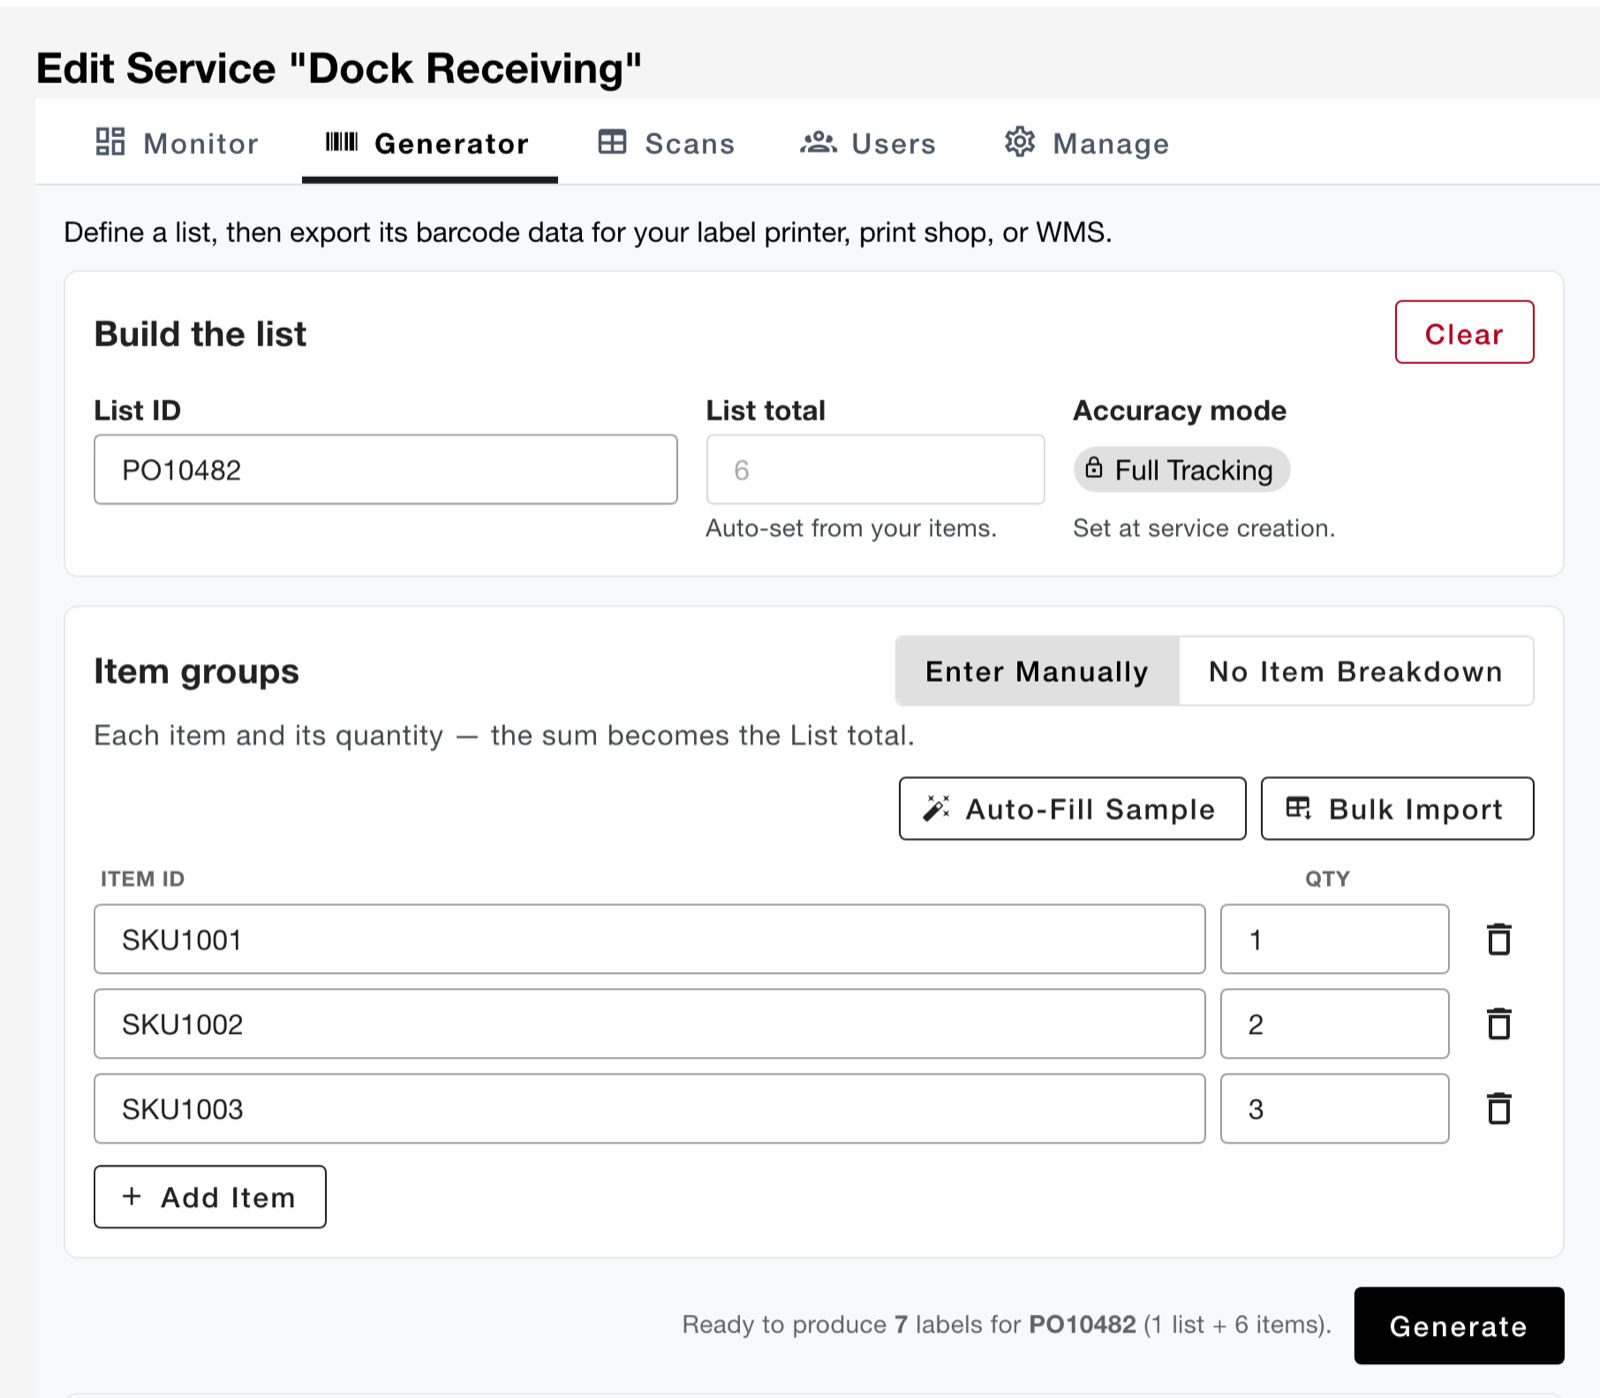
- Enter a List ID of up to 64 characters, such as a PO or order number. Letters, digits, and most punctuation are fine. It can’t contain quotes, backticks, backslashes, angle brackets, ampersands, or either delimiter (
-or|by default), so use PO10482 rather than PO-10482. - Full Tracking: under Item groups, add one row per item ID with its Qty. The List total is the sum of the quantities. Count Only: enter the List total yourself.
- Bulk Import: paste rows, or choose a CSV/TSV file, with two columns, Item ID and quantity (a blank quantity counts as 1). Pasting straight from Excel works too. Choose Import (replace rows) or Import (append rows).
- Auto-Fill Sample: fills in example rows so you can try things out.
- No Item Breakdown: use this when only the total count matters for a list. Every item is labeled as a generic UNIT.
- List each item ID once. If one repeats, click Merge duplicates.
- Click Generate. You get one label for the list plus one for each item. A list can have up to 5,000 items.
Your list is kept in this browser, so you can switch tabs and come back to it. It isn’t stored in your CodeREADr account, so keep your exported file for your records.
Export the labels
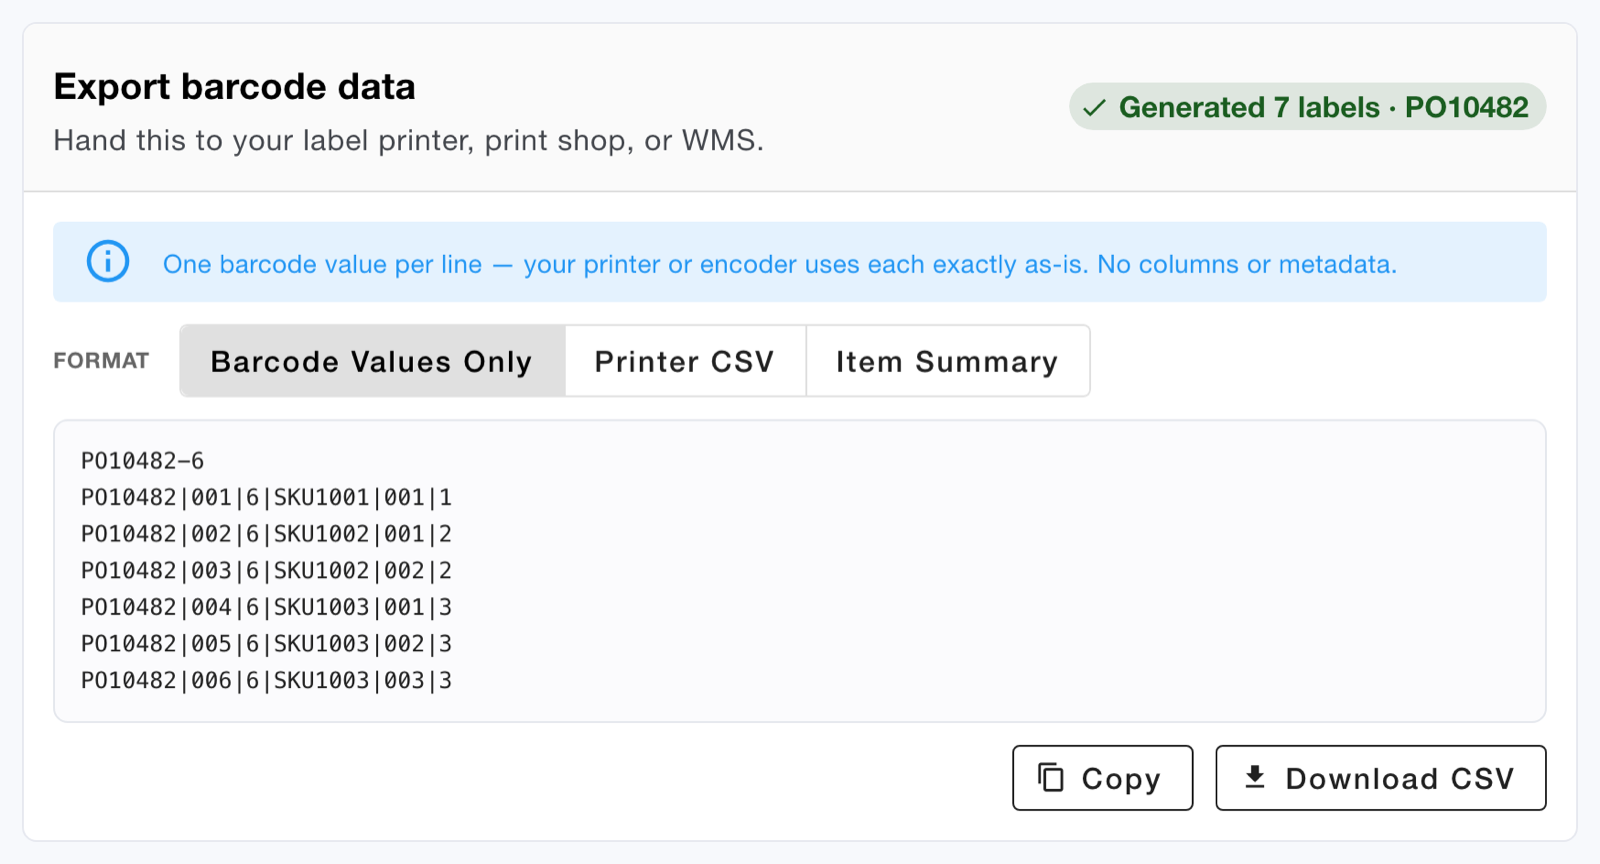
Under Export barcode data, choose a format, then click Copy or Download CSV:
- Barcode Values Only: one barcode value per line, for a printer or encoder to use exactly as-is.
- Printer CSV: one row per label, with each part of the barcode in its own column plus the final
barcode_value, for mapping onto a label template. - Item Summary (Full Tracking): one row per item ID with its quantity. This is a picking checklist, not scannable barcodes, and you can load it back in with Bulk Import.
Export Barcode Images creates a ZIP file with one barcode image per label, using the default barcode template or your own branded one. It runs as a background task and emails you a download link, which is best for large lists. It’s available to account owners and admins. Each export saves a database named “IV Export …” to your account. These aren’t deleted automatically, so remove them from Databases when you no longer need them.
Printing labels from your own system? You can create the barcode values in your WMS, ERP, or label software instead, as long as they match the format exactly. The Printer CSV makes a good template. Every barcode on a list must show the list total written the same way (010 and 10 don’t match), and positions run from 1 to the total.
Try it before you print
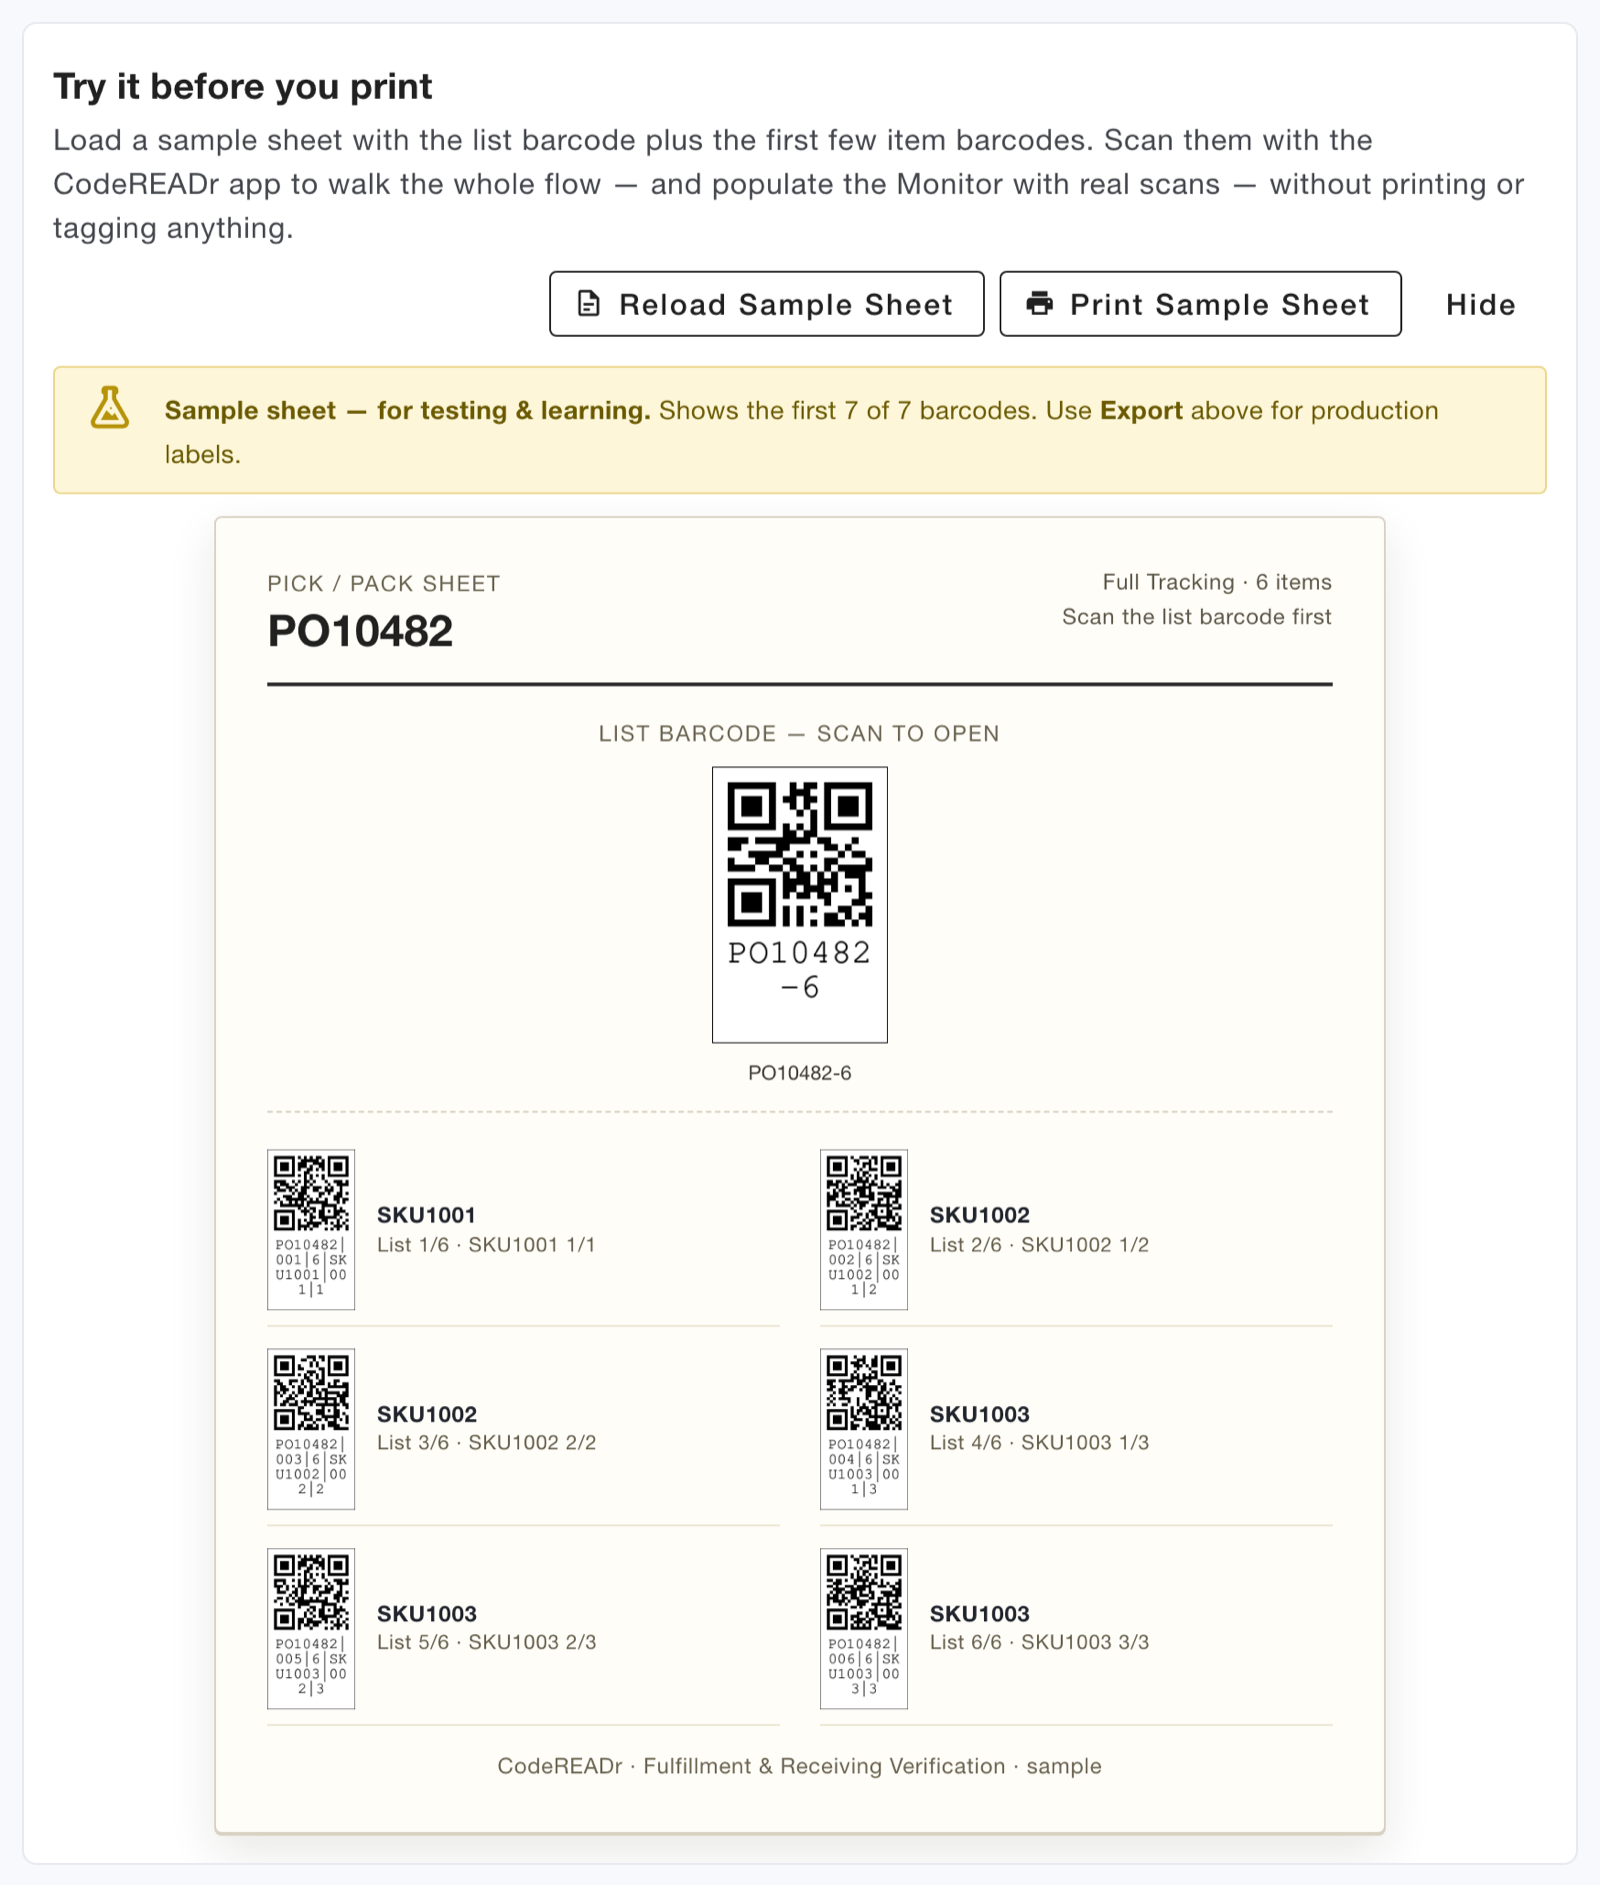
Click Load Sample Sheet to show the list barcode and the first few item barcodes on screen as QR codes. Scan them straight from your monitor with the CodeREADr app to walk through the whole flow before printing anything. These are real scans, so they also appear on the Monitor. Print Sample Sheet prints the page. For production labels, use the export options above.
Step 3: Choose who scans (Users tab)
Check the box next to each user who should scan with this service, then click Save Changes. Click Add User to create a new app user.
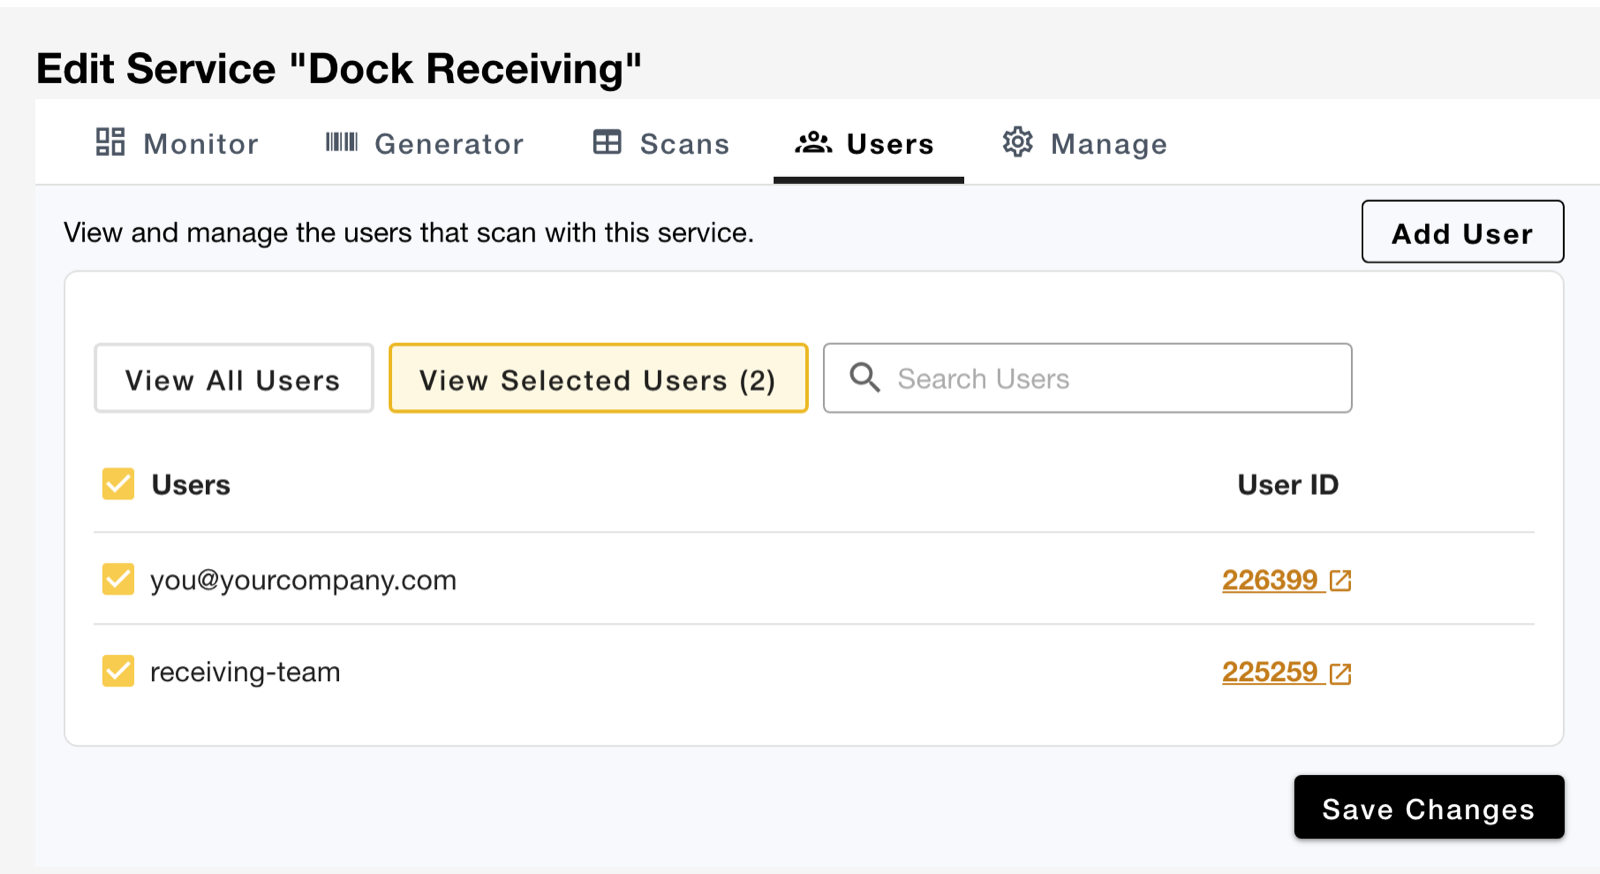
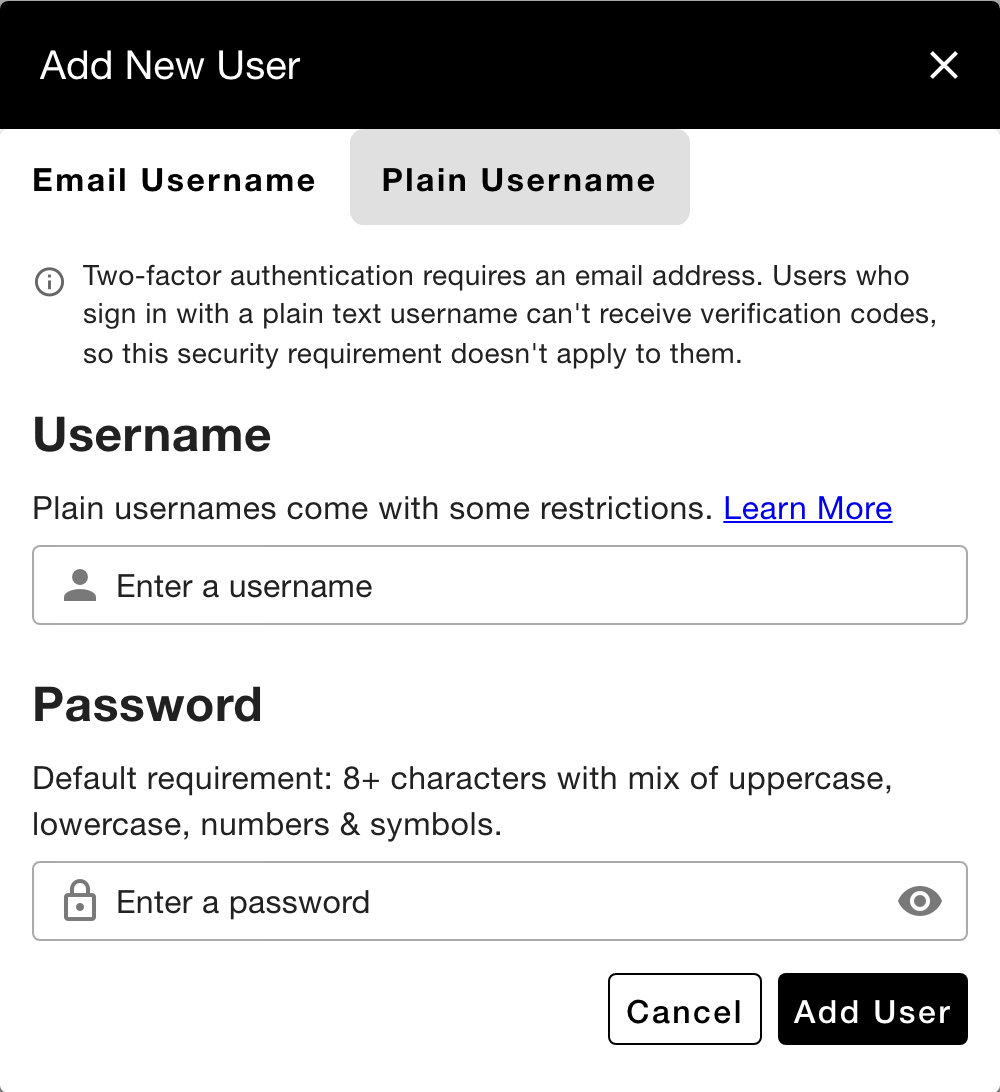
Scanning at someone else’s dock? If your receiving partner or customer does the scanning, create an app user for them and share the sign-in. It can be an email username (such as receiving@partner.com) or a plain username (such as partner-receiving). They can then scan your labels with the CodeREADr app without setting up an account of their own. Users who sign in with a plain username can’t receive two-factor verification codes.
Step 4 (optional): Adjust settings (Manage tab)
- Service Name: rename the service at any time.
- Accuracy Mode: shown for reference. It’s locked once the service is created.
- List delimiter / Item delimiter (Advanced): the characters that separate the parts of each barcode,
-and|by default. They apply to every list in the service. Change them only if your IDs contain those characters, and before you print labels, because labels printed with the old delimiters won’t scan afterwards. Each must be a single character that isn’t a letter, digit, space, backslash, or one of" ' ` < > &, and the two must be different.
Four options, all off by default, fine-tune scanning:
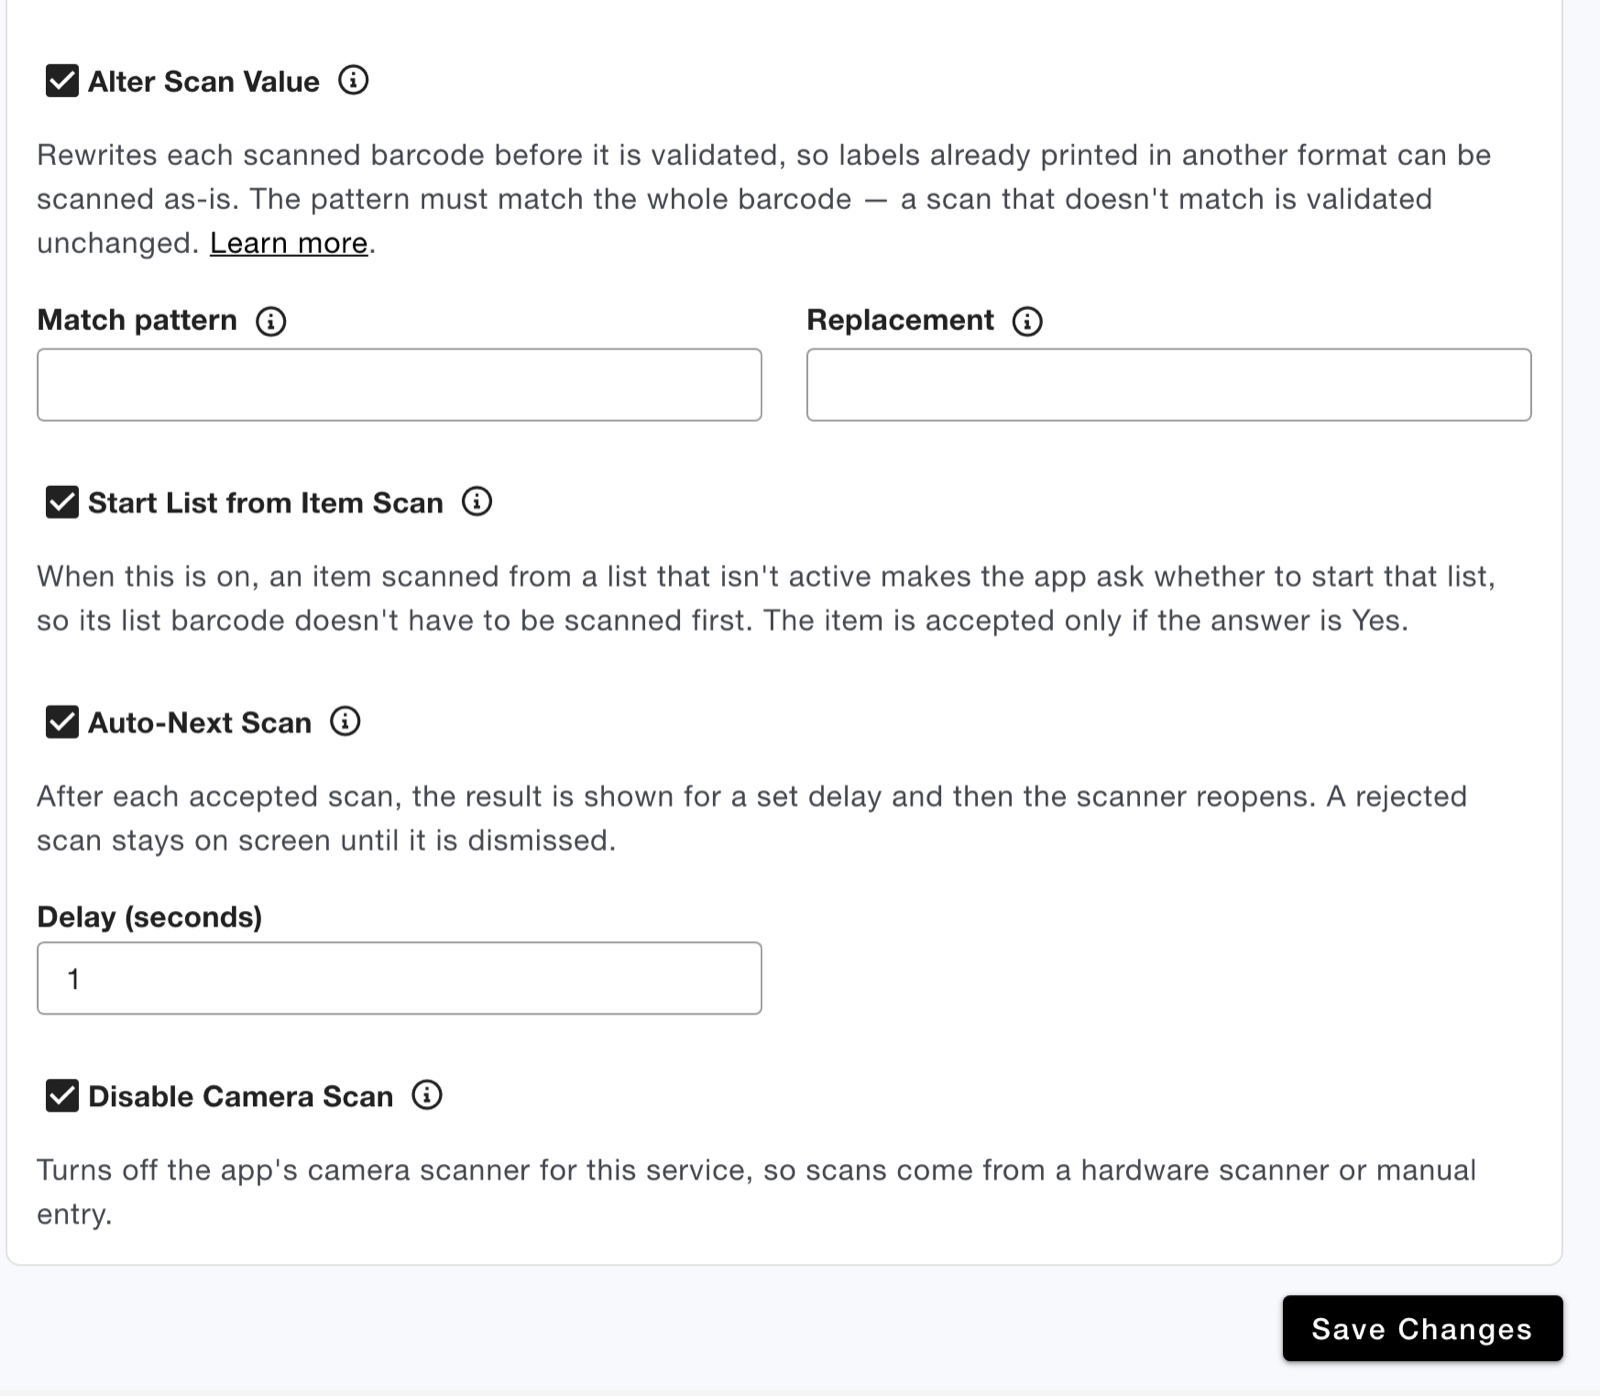
- Alter Scan Value: rewrites each scanned barcode before it’s checked, so labels already printed in another format can be scanned as-is. Enter a Match pattern and a Replacement. The pattern must match the whole barcode, and a scan that doesn’t match is checked unchanged. Learn more about Alter Scan Value.
- Start List from Item Scan: when someone scans an item from a list that isn’t active, the app asks whether to start that list, so its list barcode doesn’t have to be scanned first. The item is accepted only if the answer is Yes. (See Starting a list from an item scan below.)
- Auto-Next Scan: after each accepted scan, the result is shown for a set delay of 1–10 seconds, then the scanner reopens by itself. A rejected scan stays on screen until it’s dismissed.
- Disable Camera Scan: turns off the app’s camera scanner for this service, so scans come from a hardware scanner or manual entry.
Click Save Changes. App users pick up the new settings once the app refreshes its services. They can tap the refresh icon on the services screen to do this right away.
Scanning with the service
In the CodeREADr app, tap the service, then:
- Scan the list barcode. The app confirms “Now verifying List: PO10482.” and shows how many items remain.
- Scan each item’s barcode, in any order. Each accepted scan shows VALID, “Item verified.”, the items remaining, and progress for the list and for each item ID.
- Finish the list. The last item shows “Last item verified. List complete.”
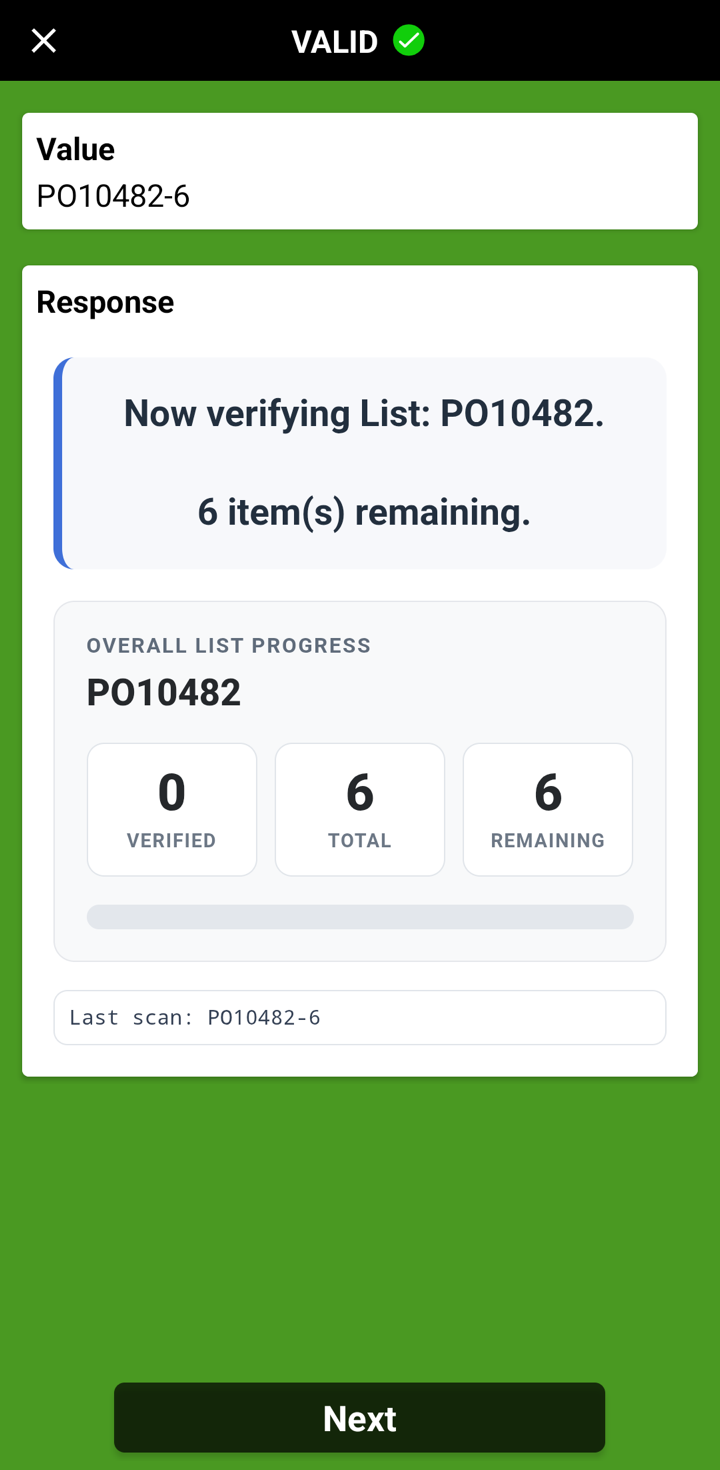
Scan the list barcode
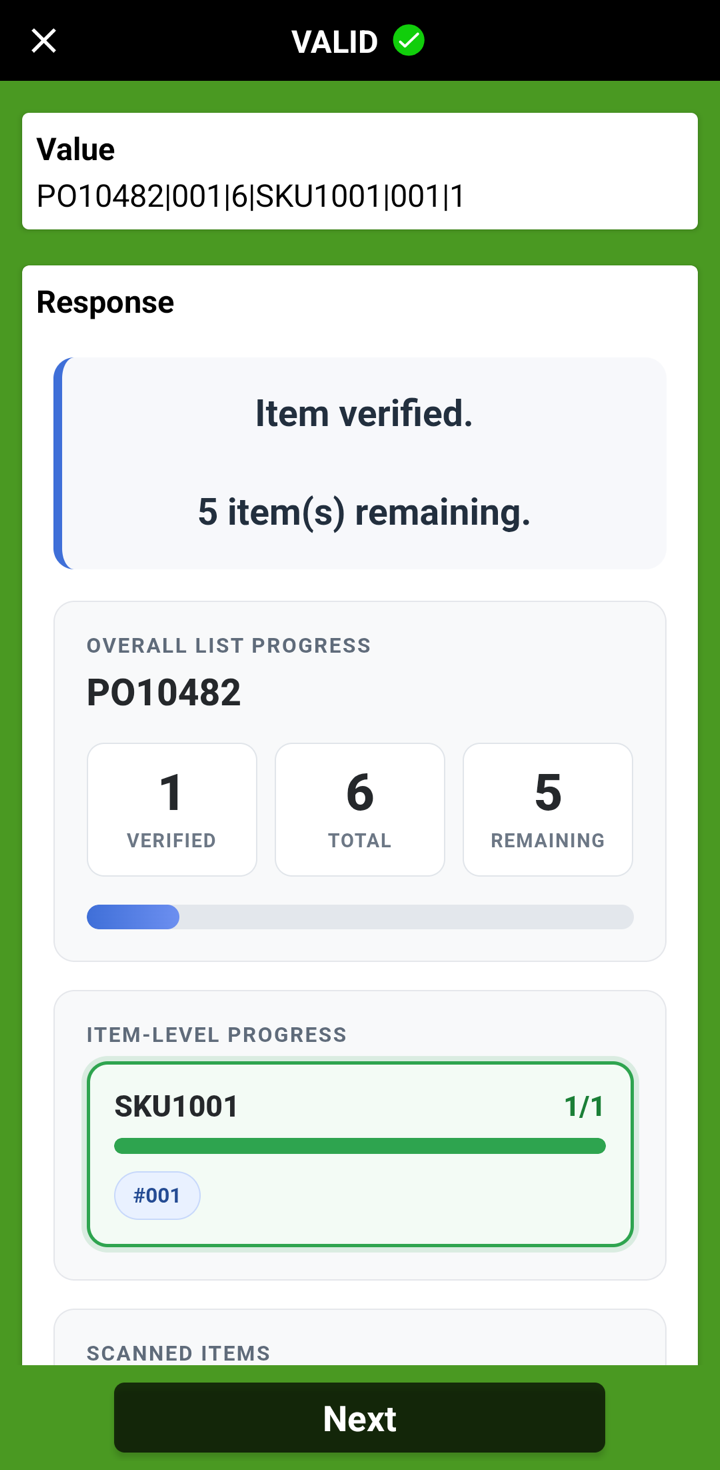
Scan each item
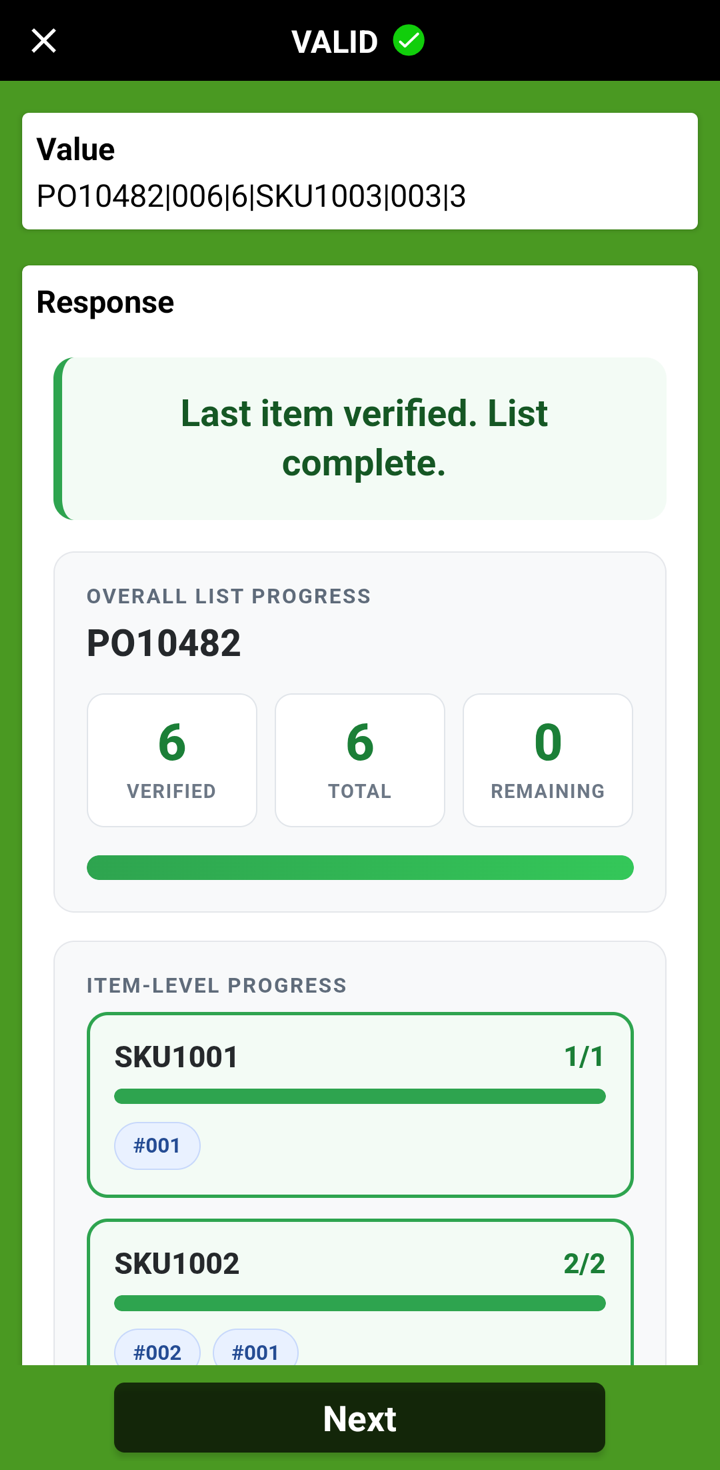
List complete
Anything that doesn’t belong is rejected with a red INVALID result and the reason, for example an item scanned twice or an item from a different list:
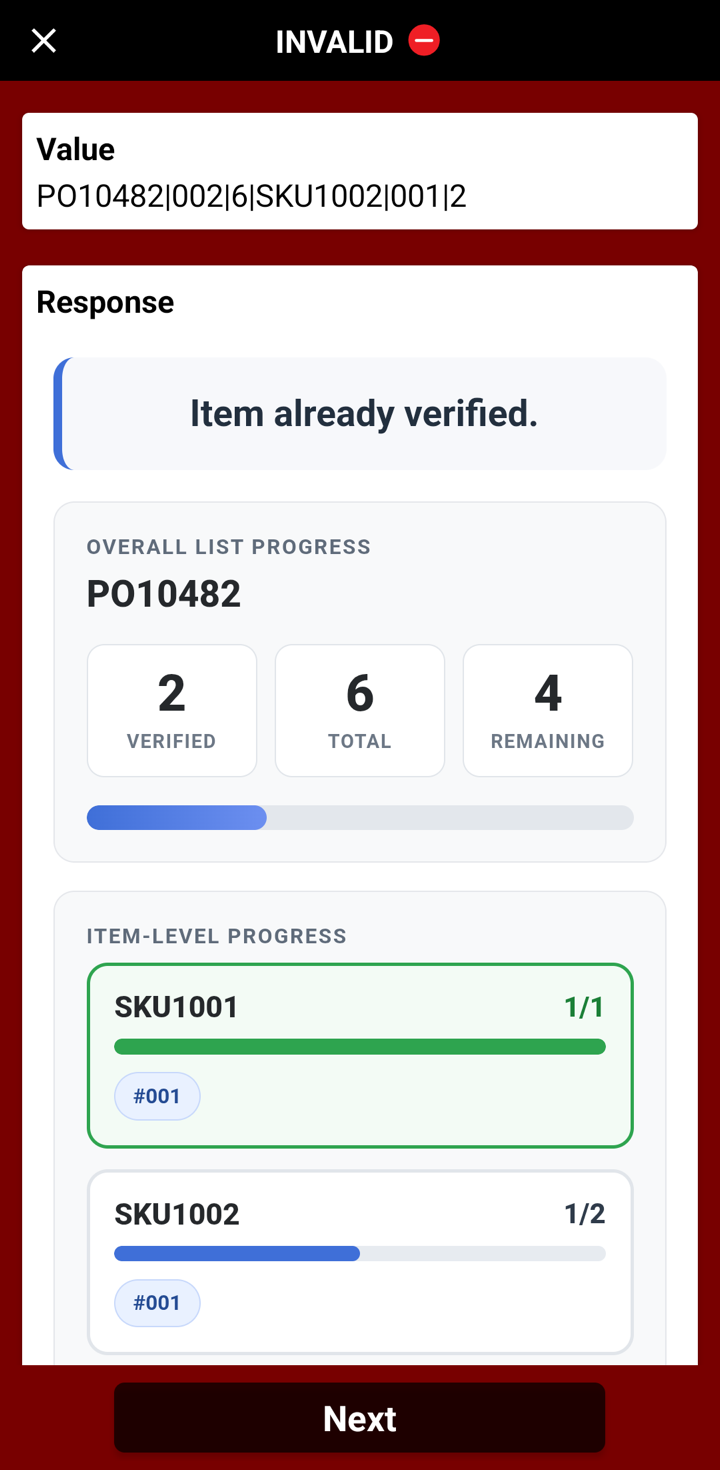
Item scanned twice
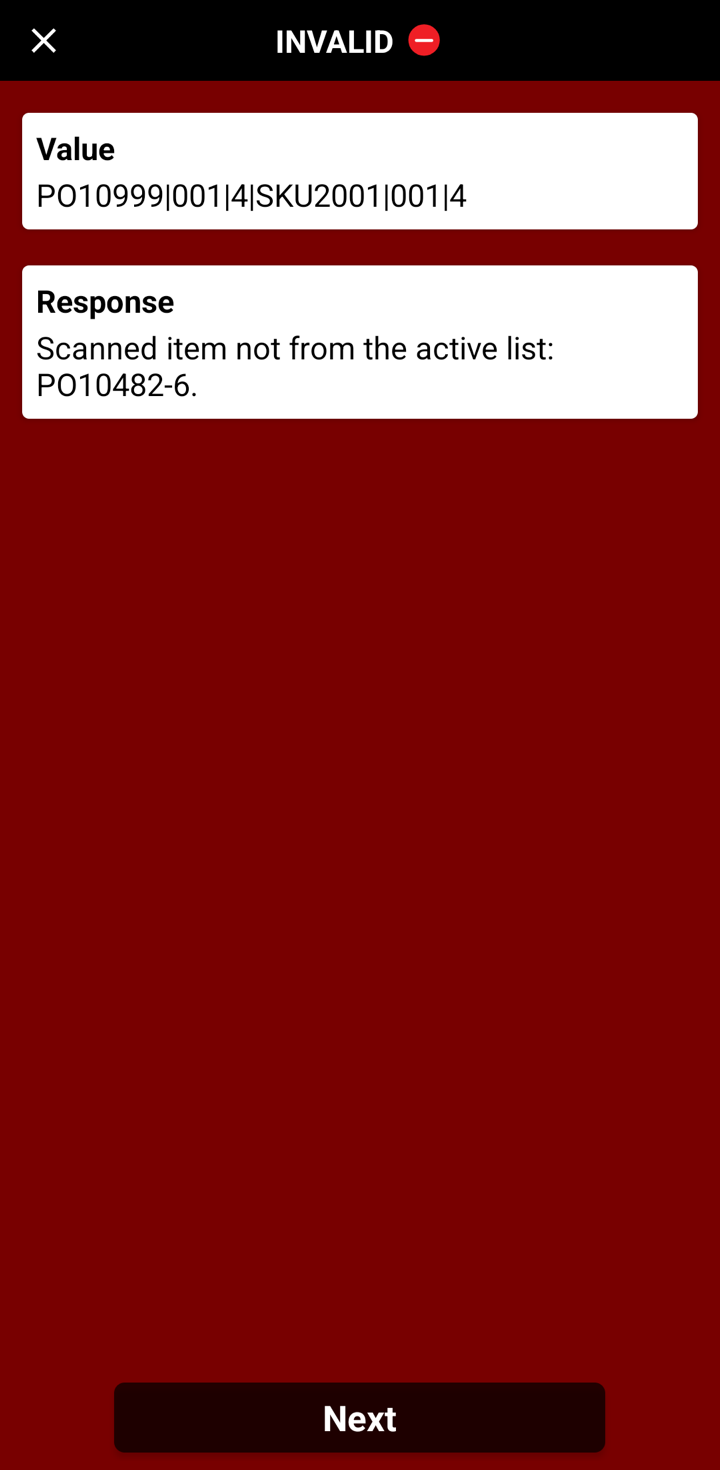
Item from another list
Good to know
- Items can be scanned in any order, but the list barcode comes first unless Start List from Item Scan is on.
- Scanning a different list barcode switches to that list. Progress is kept, so you can return to a list by scanning its list barcode again.
- The active list is remembered for each app user on each device.
- Several app users can work the same list at once. They share its progress, so an item one person has verified counts as a duplicate for everyone else.
- Rejected scans are still recorded, and they appear on the Monitor as discrepancies.
Starting a list from an item scan
With Start List from Item Scan turned on, scanning an item from a list that isn’t active asks “Start list PO10484 (3 items)?”, or “Switch from list PO10483 to list PO10484 (3 items)?” if another list is active. Choose Yes and tap Submit to start that list and accept the item. Choose No to leave the current list active; the item isn’t accepted. Only the app user who scanned the item can answer.
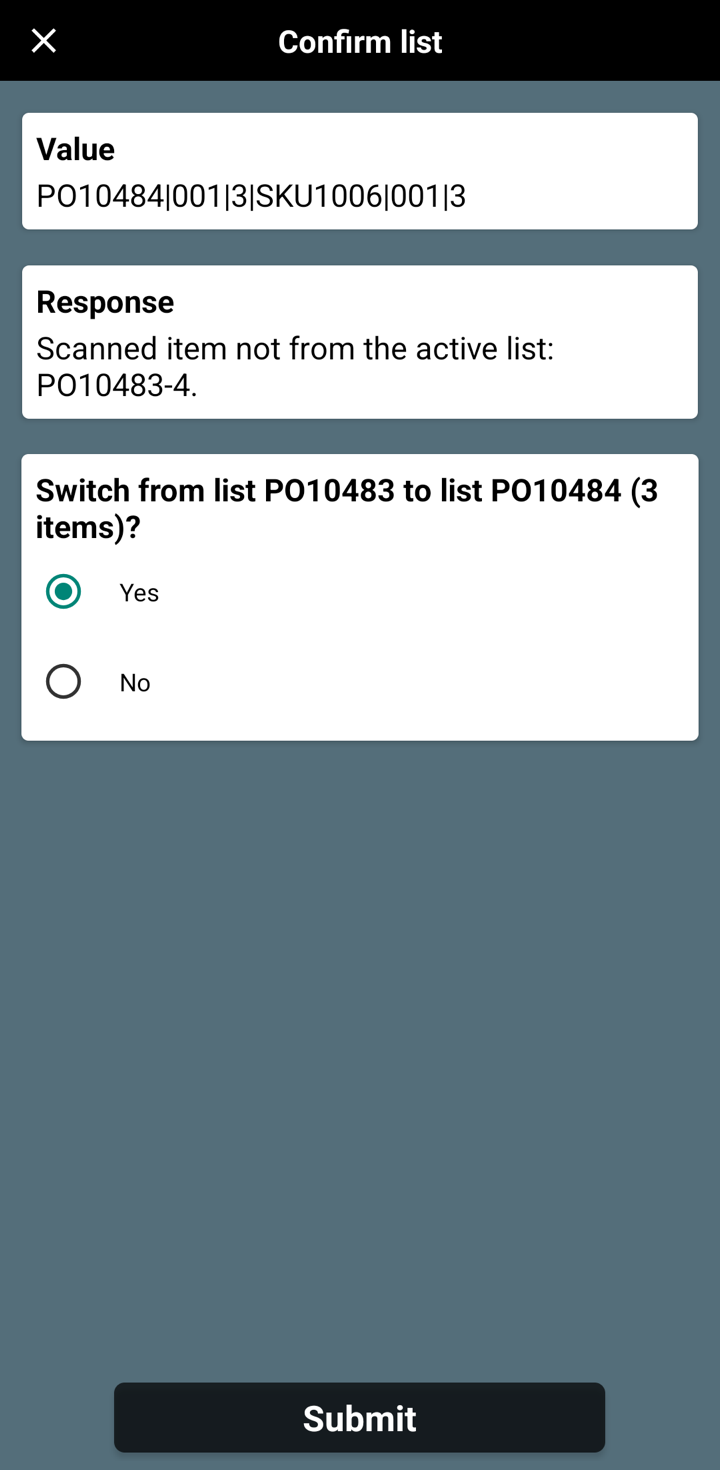
Confirm the new list
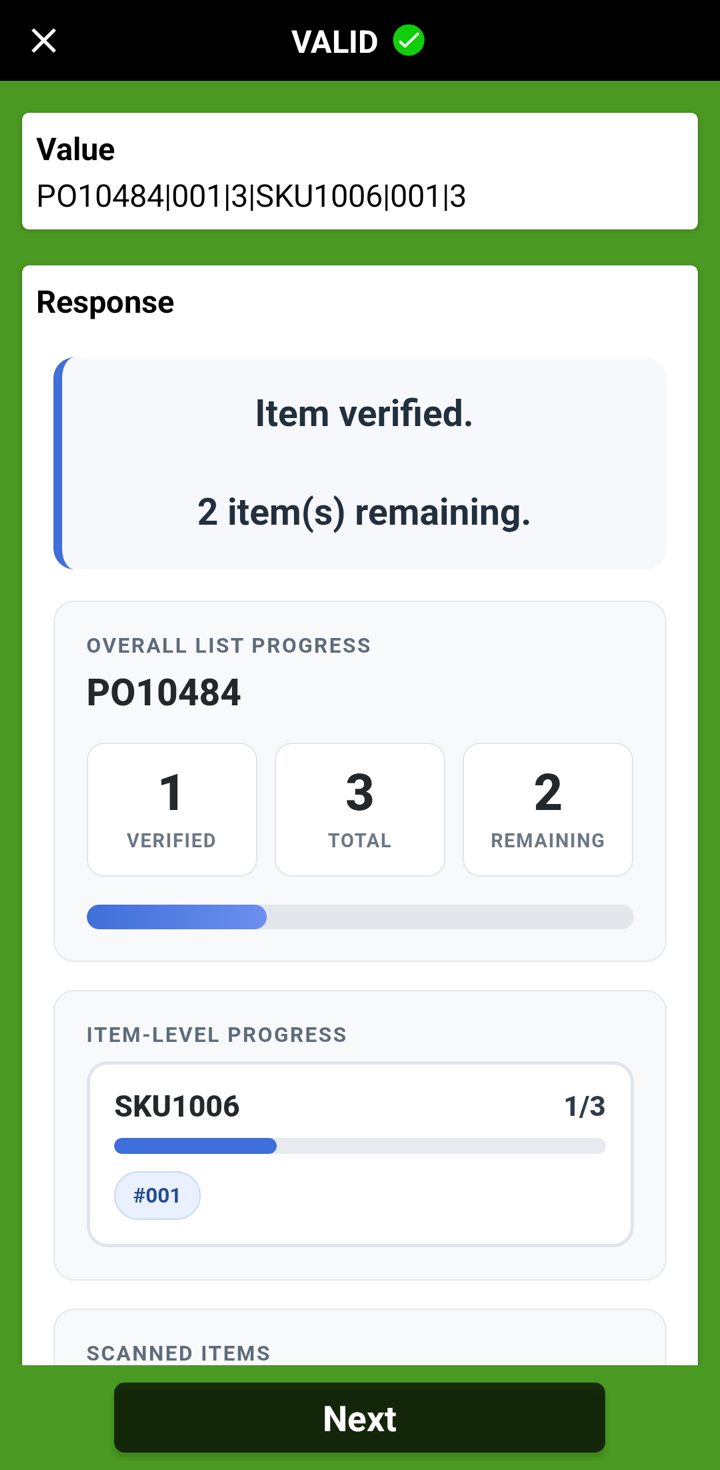
Item accepted
Monitoring progress (Monitor tab)
The Monitor tab shows every list scanned with the service. Choose a range (Today, the default, 7 Days, 30 Days, Custom, or All), and click Refresh for the latest scans.
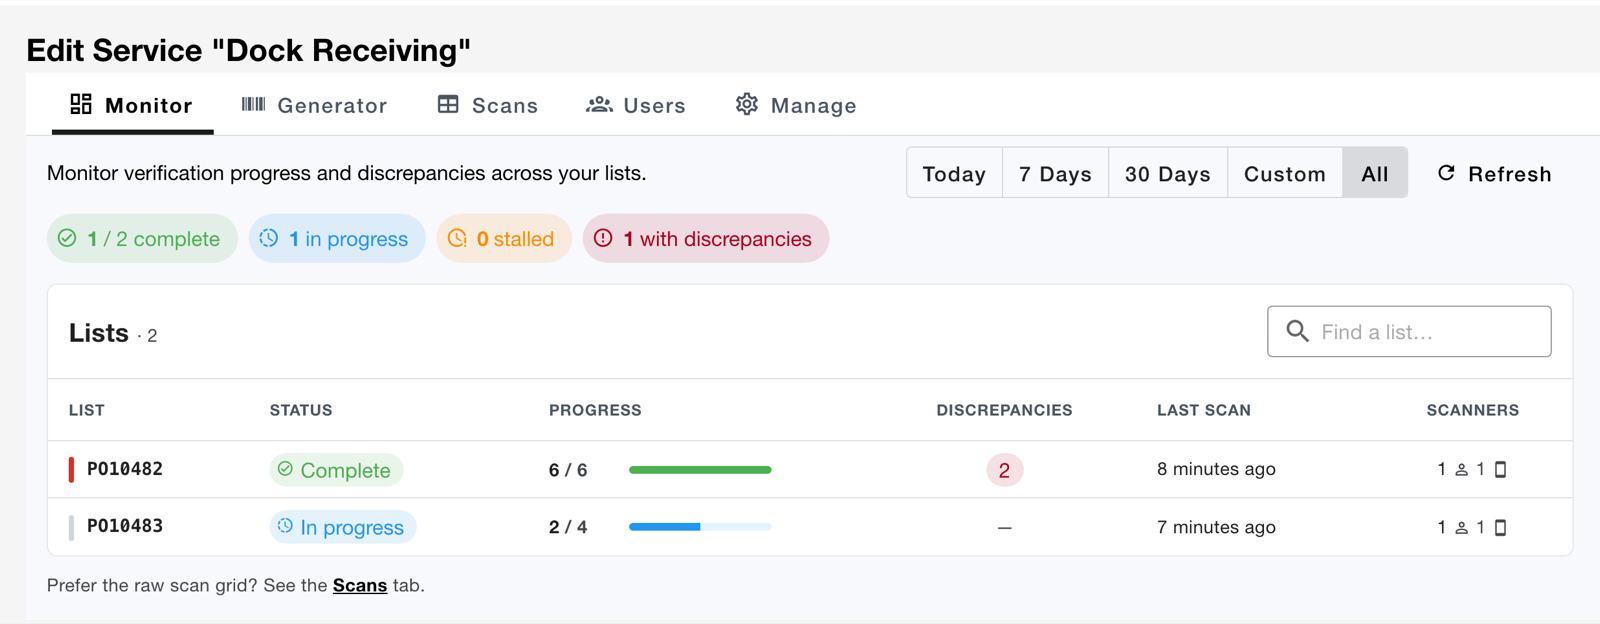
- With All selected, each list shows its status and progress. Complete means every item is verified, In progress means some are, and Stalled means the list isn’t complete and hasn’t been scanned for 24 hours. The other ranges show each list’s activity within that range.
- Click a summary chip, such as with discrepancies, to filter the lists. Type in Find a list… to search.
- A list appears on the Monitor after its first item scan.
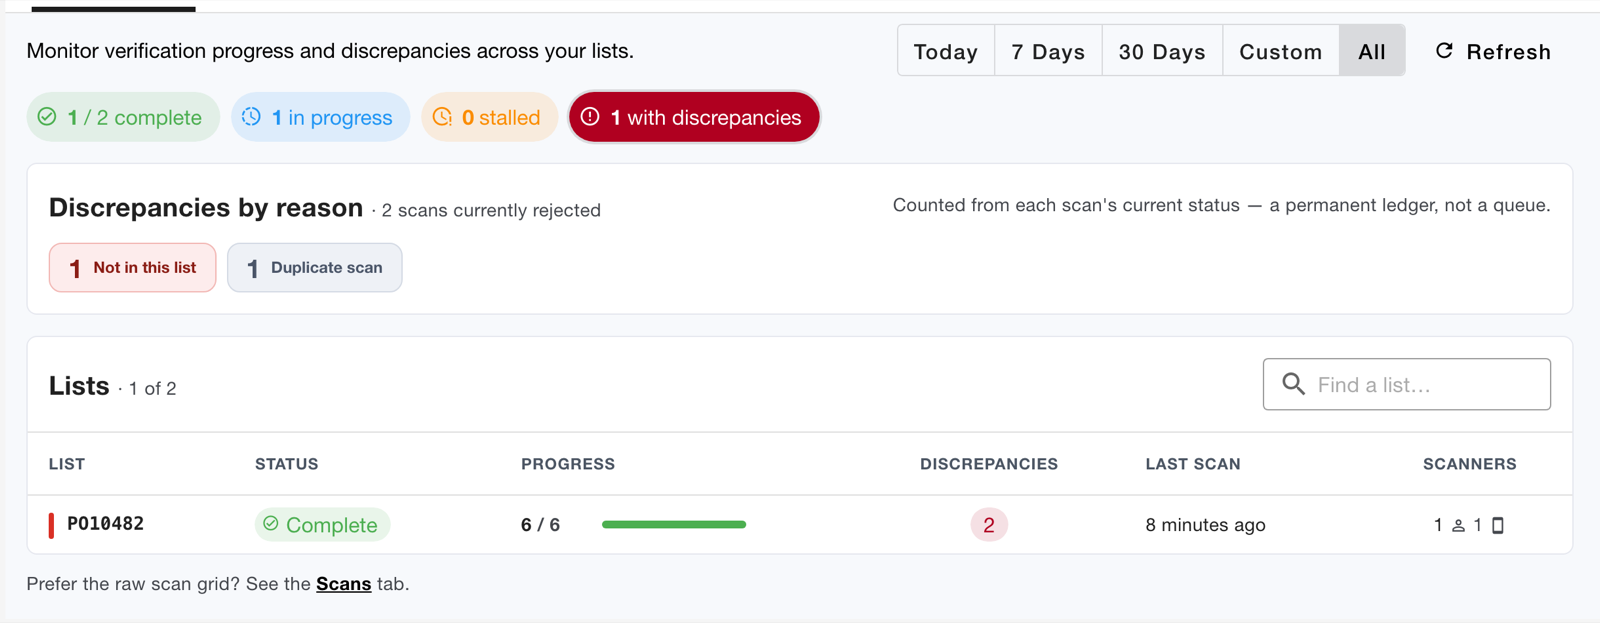
Discrepancies by reason groups every rejected scan by cause, such as Not in this list, Duplicate scan, or Quantity mismatch. It’s a permanent record of what happened, not a to-do queue, so entries can’t be acknowledged or cleared.
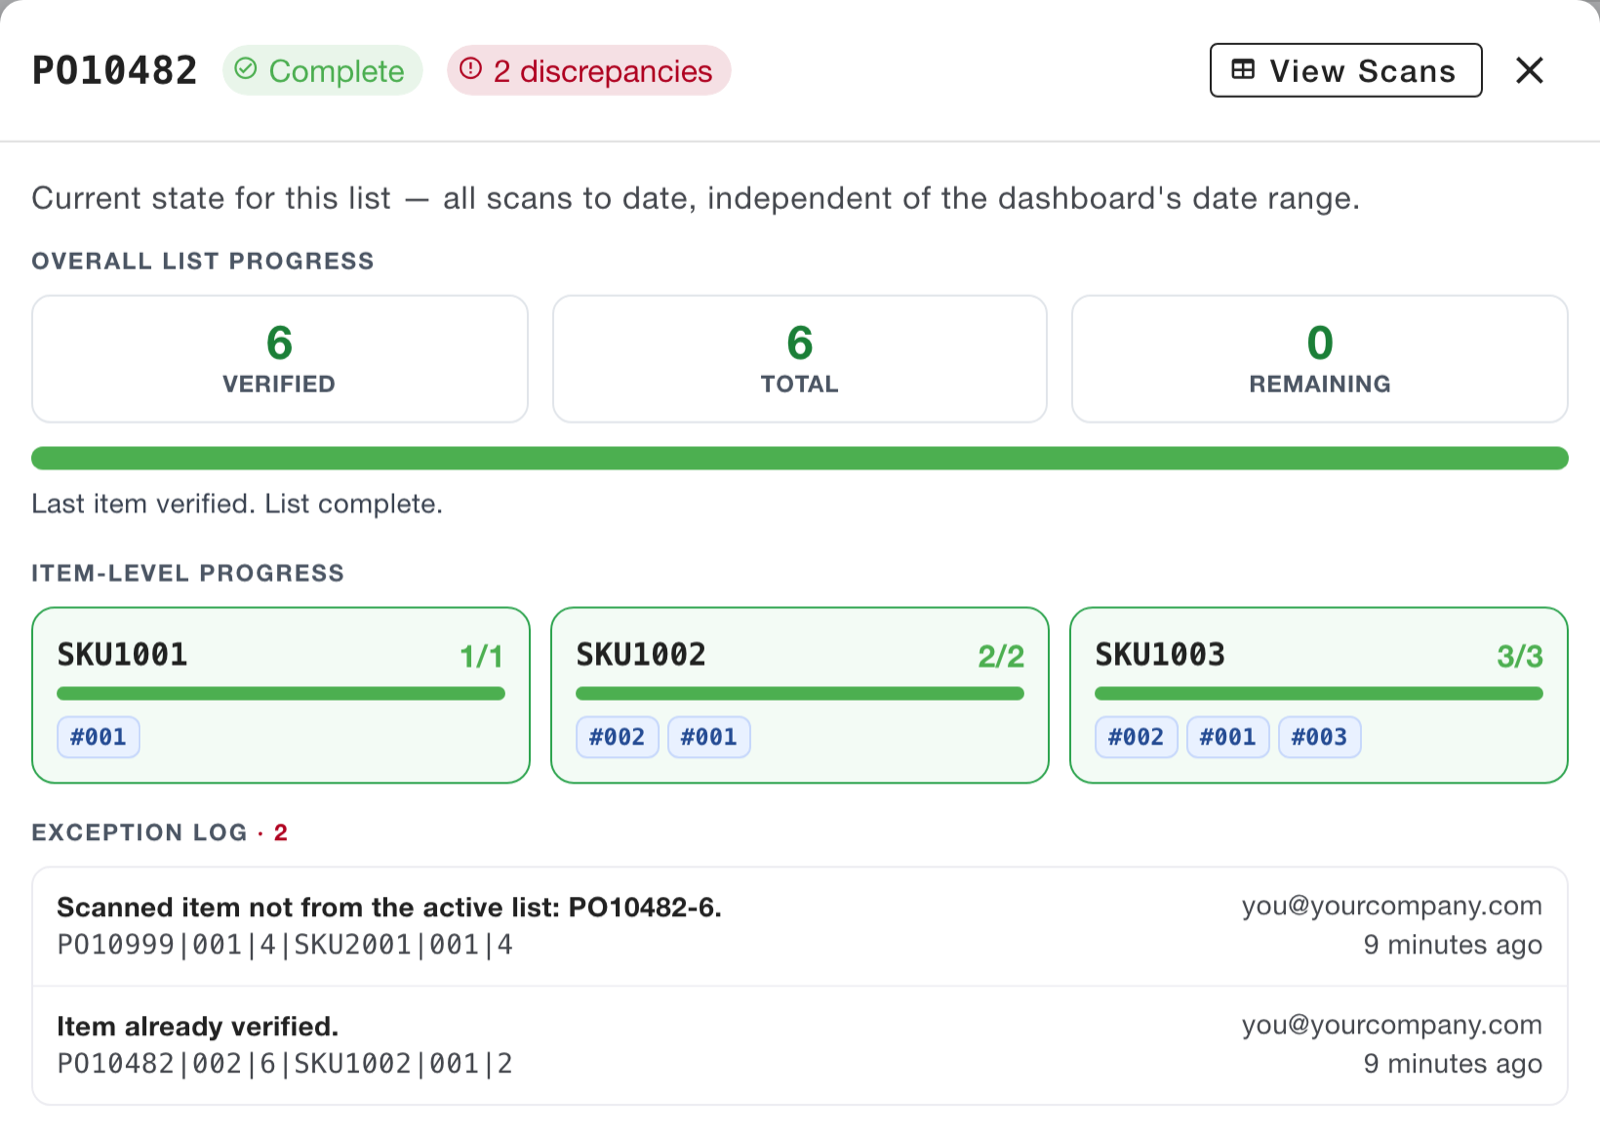
Click a list to open its details:
- overall and item-level progress,
- an Exception log of rejected scans, showing who scanned them and when,
- a Scan timeline of recent scans.
The details always cover the list’s full history, whatever range is selected. Click View Scans to see the list’s scan records.
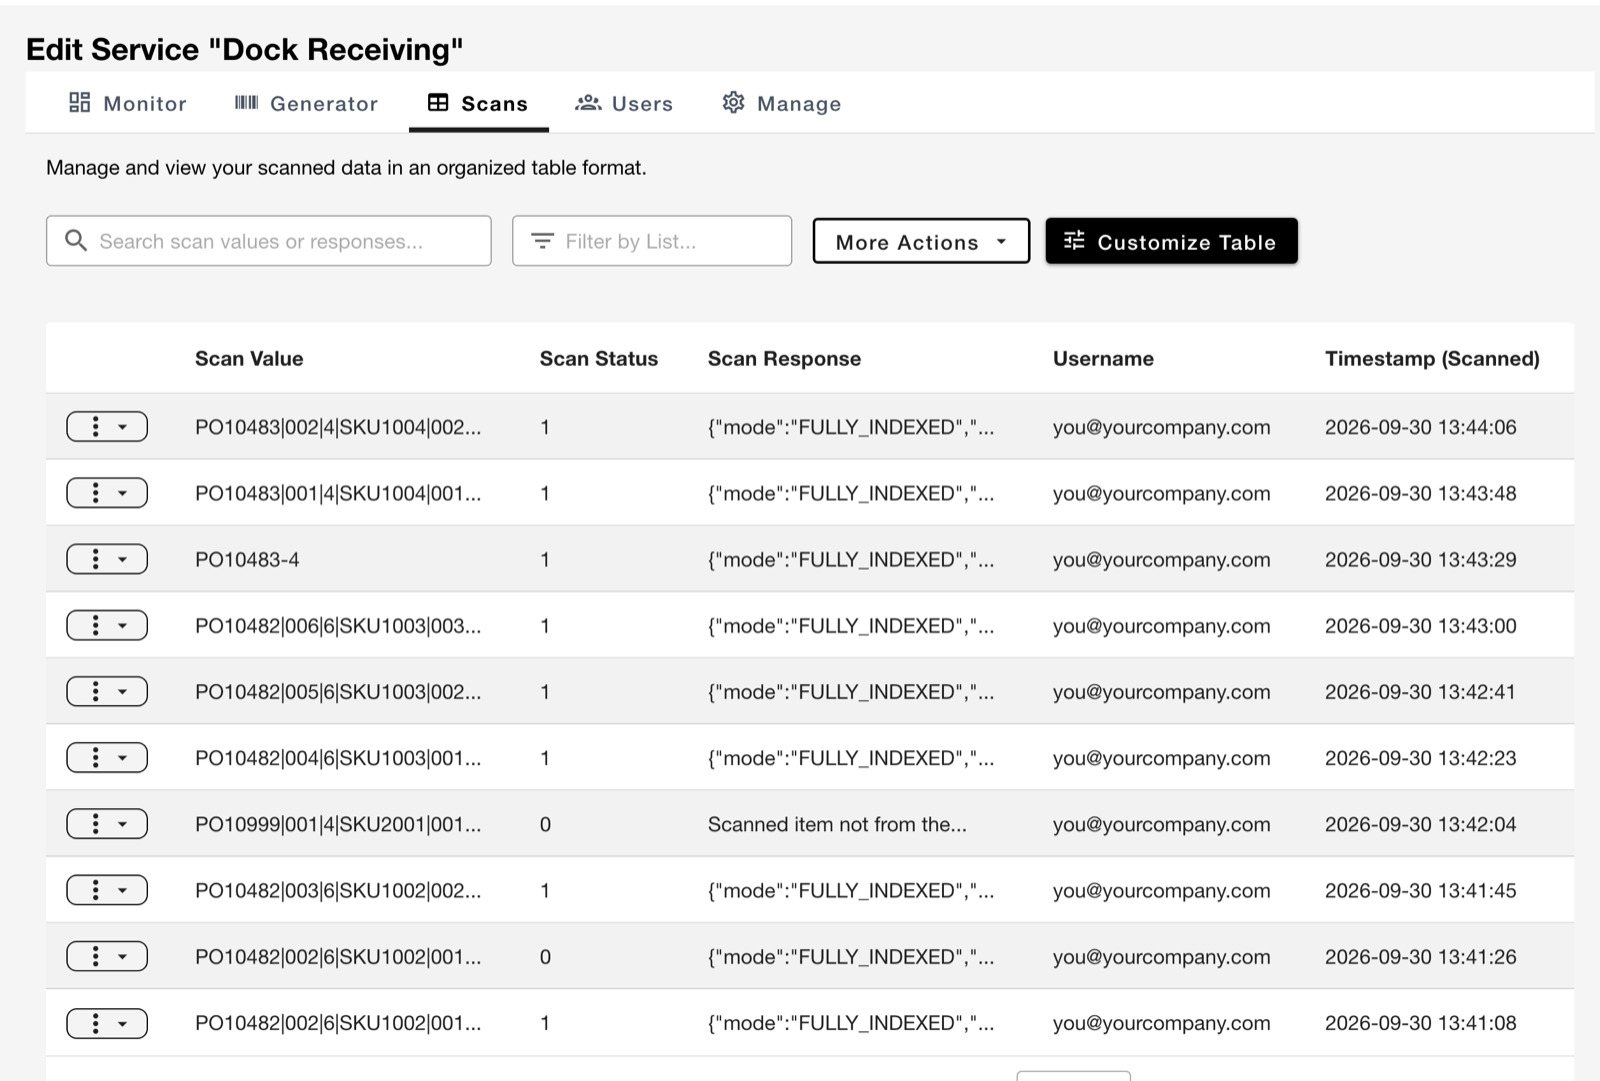
Scans tab
The Scans tab lists every scan record: its value, status (1 = valid, 0 = invalid), response, username, and time. Search scan values or responses, use Filter by List to narrow the records to one list, and use Customize Table to choose and arrange the columns.
Troubleshooting
| The app says… | What it means | What to do |
|---|---|---|
| Scanned item not from the active list: … | The item belongs to a different list than the active one. NONE means no list is active yet. | Scan the list barcode for the item’s list first, or set the item aside. Or turn on Start List from Item Scan. |
| Item already verified. | This exact item was already accepted, by you or another app user. | Nothing. It’s counted once. If it keeps happening, check for duplicate labels. |
| All items already verified. | The list is already complete. | Set the item aside and check it against the list. |
| List index … already verified. Item … index … already verified. |
A different label with the same position was already accepted, which usually means a misprinted or copied label. | Check the label against the list, and reprint it if needed. |
| Item barcode list total … does not match active list total … | The label was printed for a different version of the list. | Reprint the labels from the current list. |
| Item … quantity … does not match previously recorded … | Labels for the same item ID carry different quantities. | Reprint the labels from the current list. |
| … outside range 1-… | A position on the label is outside the range its total allows. | Reprint the label. |
| Invalid barcode format. | The barcode isn’t a list or item barcode for this service. For example, it’s an item’s own UPC, or a label printed with different delimiters. | Scan the generated label, and check the delimiters on the Manage tab. |
| List … not started. | The app user answered No when asked to start a list. | Scan the item again and answer Yes, or scan the list’s barcode. |