How to capture a photo and use it for verification purposes in real time with a smartphone or tablet
Step-by-Step Tutorial
[If you would like the CodeREADr team to set up the initial set up for you please email support@codereadr.com]
Initial Setup
1. Dropbox Setup
If you do not already have a Dropbox account. Sign up for one.
2. Setup the API Key
Record (copy and paste) the API Key associated with your CodeREADr account.
Select ‘Account’ in Navigation Bar of Your CodeREADr Account
Click the “API” Icon
Copy the API Key and Record it (e.g. paste it into a text document)

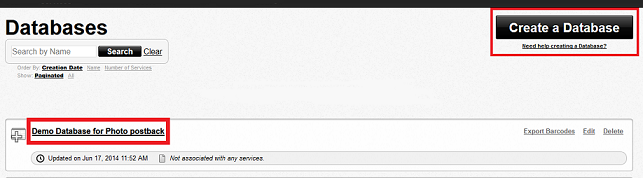
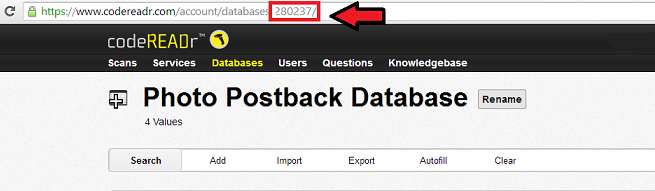
3. Record the Database ID
Record (copy and paste) the Database ID from either a new or existing database.
Select ‘Databases’ in the Navigation Bar
Select an Existing Database or Create a New One.
Record (Copy and Paste) the Numbers in the URL
Those Numbers are Your Database ID
4. Create a Custom URL
Insert API key and Database into this postback URL template to create a custom URL.
You must replace API_KEY and DB_ID with your own values.
This URL will be pasted into the “Postback scans after they are received by the server” field in Advanced Settings.
Service Configuration
5. Select ‘Services’ on the Navigation Page

6. Create a Service

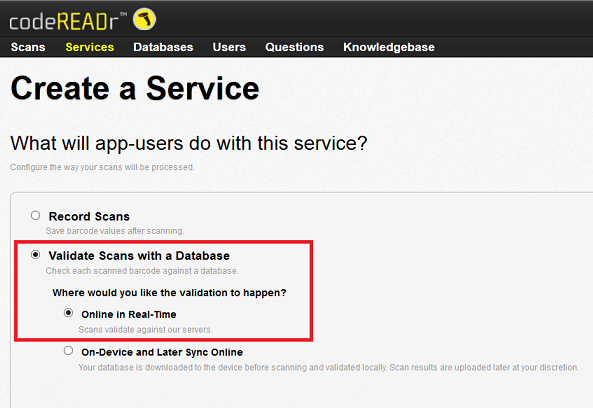
7. Set to Online Validation Service
Select ‘Validate Scans with a Database’ and then Select the Online Validation Service option.
Warning: Do NOT select ‘On-device and Later Sync Online’ option as it will not work with Photo Postback configuration.
8. Select the Database
In the initial set up – a numeric ‘Database ID’ was retrieved from the URL of a database. Select that database from the dropdown menu.

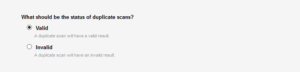
9. Set duplicate scans to Valid
It is important to set duplicate scans to ‘Valid’ for reentry applications as it will allow any barcode that is in the database to be scanned an unlimited amount of times and continue to return a ‘Valid’ scan result.
10. Apply a Validation Pattern This step is no longer necessary.
Select ‘Apply a Validation Pattern’ option and then select the Force an invalid response when a scan match is made checkbox.
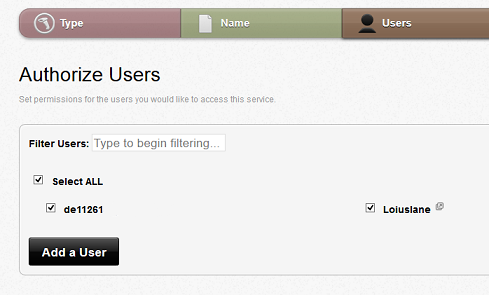
11. Name the Service and Select Authorized Users
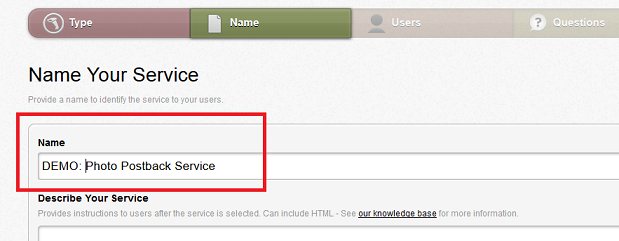
Select Authorized Users for the Service >> Save and Continue
12. Select Add a Question
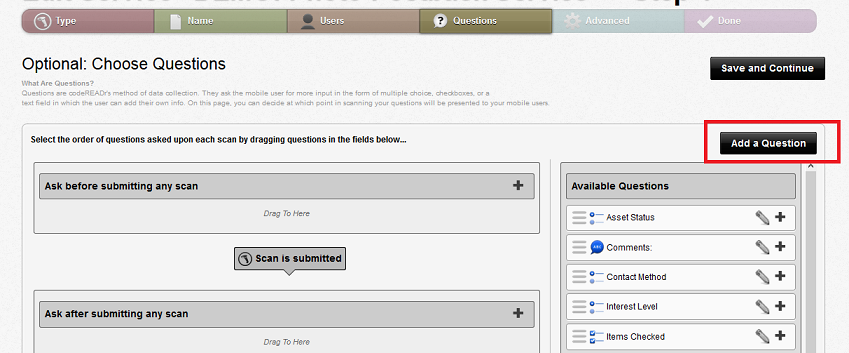
13 Select: 'New Photo Collect' in the Dropdown Menu

14. Name the Question
Once you have provided a name for the question and define the parameters for Dropbox or FTP select the submit button

15. Create the Question Flow
Drag the new question (in this case called 'Dropbox Question') from the list of Available Questions on the right to either:
- 'Ask after submitting a valid scan' field: Use this option if the barcode is to be checked against your original ticket database
- 'Ask after submitting any scan' field: Use this option if the CodeREADr app is not checking for validity against your ticket database

16. Required Advanced Settings
In Advanced Set up: "Postback scans after they are received by the server" and "Alter Response Value" options must be selected.
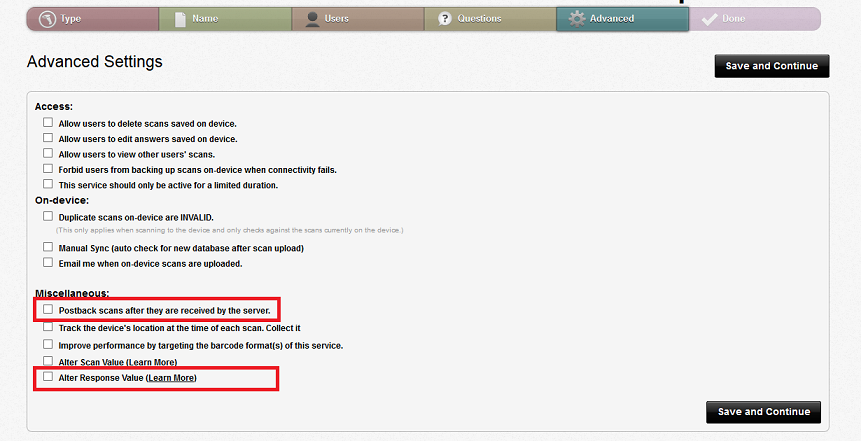
17. Postback Configuration
Configurations for the Postback scans after they are received by the server settings must be:
- Select both online and on-device check boxes
- Select the Full Postback option
- Copy the Postback URL that you created in the initial setup and paste it into the field below.

18. Alter Response Value
Configurations for the Alter Response Value advanced setting must include an Alter Response Pattern in one field and Alter Response Replacement in the field below it.

Copy and Paste this Alter Response Pattern in the first field:
^([sS]*)$
Copy and Paste the script in the link below into the Alter Response Replacement field based on whether you are using a smartphone or tablet for scanning. These are simple examples only. You can change the script to that which best suits your needs. Important: This script works for older versions of Android OS (4.1 and higher). But for this script, you need iOS 10.0 or higher even though the app supports lower iOS versions. Please ask us if you need any assistance.
19. Review and Save
Save and continue after configuring the Advanced Settings.
Review your Service specifications and click 'Done'.